Blackbean and Veggie Falafels

20181021_191709
I am glad to admit that I am not a purist. There is something a bit more personal and exciting about bending the norms a little. At least in the food we enjoy! Think about it…if you always followed the same cake or casserole recipe, won’t you be bored? That’s when we get creative with tossing in a little bit of this and that or “wing it” along the way.

These falafels are the result of going with the flow and keeping my fingers crossed that they won’t be a crumbly or horrible tasting mess. Inspiration for this recipe, which uses cauliflower, sweet potato and black beans came from watching the recent trends with cauliflower everything, including pizza crust! PIZZA CRUST! If cauliflower could be a pizza crust, it better be a darn good falafel. And it delivered!

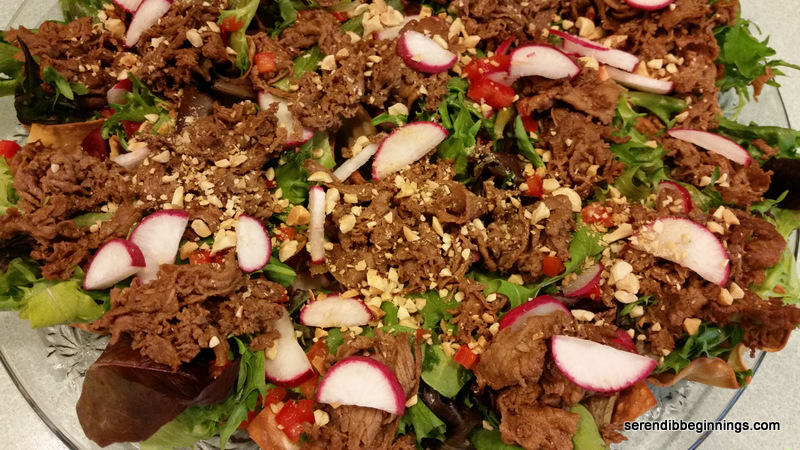
Honestly, these falafels are a winner not not because they have a good doze of veggies, but also because they are oven-baked with a light drizzle of oil and not deep fried like the traditional ones. What is not to love about it, right?! These delicious bites held their shape, stored well for few days refrigerated and made a perfect match as a salad topper or filler for a pita. So, go ahead and make a batch! You can drop a thank you note later! 🙂

20181028_192913

Blackbean and Veggie Falafels

  • Servings: 18-20 falafels
  • Print

Note about Prep Time: Prep time is about 20 min, refrigeration for about 30 min and cook (bake) time about 45 min.

Ingredients:

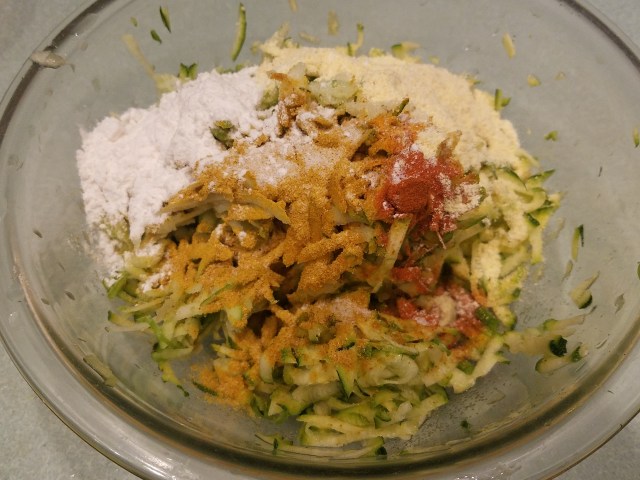
1 1/2 cups grated cauliflower

1 1/2 cups grated sweet potato

1/4 cup finely chopped onions

3 cloves of garlic, finely minced

1 heaping teaspoon smoked paprika

1 tablespoon coriander seeds

1 teaspoon cumin seeds

1/4 teaspoon cayenne powder

Salt to taste

1 14.5oz black beans, drained and rinsed

1/4 cup chickpea flour

1 – 2 tablespoons olive oil

Preparation:

  1. Dry roast coriander and cumin seeds for 5 min over low heat and grind to a powder in a dry grinder or in a mortar and pestle. Set aside.
  2. In a saute pan, add 1 teaspoon olive oil and saute the vegetables, including onion and garlic. Add the ground spices, salt, paprika and cayenne. Let cool.
  3. In a medium bowl, mash the drained blackbeans. Add the vegetable mixture and chickpea flour and thoroughly mix in. Cover and refrigerate for about 30 minutes.
  4. Preheat oven to 400F.
  5. Take the refrigerated falafel mixture out and form into about 1 to 1 1/2 inch balls.
  6. Arrange on a parchment lined baking tray and drizzle with remaining olive oil.
  7. Bake for about 25 min. Turn over and continue to bake for another 20 min till firm and golden.
  8. Serve immediately in a salad or as a wrap. Refrigerate remaining falafels.

Zucchini-Apple Fritters

20171020_150332
What a glorious weekend, but where’s autumn!?

20171018_192002

As the long summer days wound down, I was kind of excited about welcoming the glorious colors of fall! Bright hues of red, yellow, orange and brown with quickly fading greens bursting in the canopies! But, fall splendor seems to be quite elusive this year!

20171018_183250

Despite the lack of the autumn chill, I still had the timely craving for something comforting and delicious to enjoy! My appetite is so predictable! Anyway, my craving for some homemade hashbrown (potato kind), eggs and bacon didn’t really stick. For once, I convinced myself quite easily to try to make something a little lighter and healthier. As I made a mental run of things in the refrigerator, I paused at zucchinis and Granny Smith apples.

20171018_184706

I decided to make some sort of a fritter using zucchini and apple, but without any eggs. I made a version of these with eggs, and decided I am not a big fan of egg-y fritters. If you like crispy texture, you will probably not enjoy this the way I made it – unless you coat it with breadcrumbs and bake/fry. These fritters (“hashbrowns”) are sort of creamy, sort of soft, sort of pate-ish. Not sure how to explain them, but they are delicious. They are very light, so you can easily eat half the fritters…and it’s OK if you do because they are, in my opinion, quite healthy! Curry powder adds a certain depth to these fritters and I highly recommend you use them. But, if you don’t have it in your pantry, you can skip it.

20171018_184820

These fritters are quite versatile. They will go well with eggs for breakfast or with rice and curries for a main course or just a little snack! I also stored leftovers for couple of days in the refrigerator and they warmed up beautifully in the microwave. Hope you give this recipe a try!

20171018_190404

Zucchini-Apple Fritters

  • Servings: 4-6
  • Print

Ingredients
2 zucchinis, grated
1/2 Granny Smith apple, grated
2 scallions, green and white part minced finely
1 teaspoon finely minced ginger
1 teaspoon curry powder
1/4 cup cornmeal
2 tablespoons all purpose flour
1/4-1/2 teaspoon of cayenne powder, if desired
Salt and pepper to taste
Few tablespoons of oil to pan fry the fritters

Preparation
1) Squeeze excess water out of the grated zucchini and apple and add to a medium bowl.
2) Add in the remaining ingredients and mix well by hand. This helps breakdown the ingredients a little so they are easy to form into little patties later on.
3) Let the mixture sit for 10 minutes to let the cornmeal and flour soak up any excess liquid.
4) Heat a frying pan over medium heat and a tablespoon of oil. Swirl around to coat.
5) Form the mixture into golf-ball sized round. Place a few in the pan with enough room around them so you can flatten the balls into small disks, about 3″ wide.
6) Cook on one side for 2 minutes or so till golden brown. Flip carefully onto the other side and cook for another 2 minutes. Remove to a serving platter and enjoy warm.

Citrusy Asian Salad in Crispy Wonton Shells

20150613_150428

It’s been a very hectic week and I didn’t have the chance to go by the grocery store like I had hoped to. There was a potluck BBQ party on Saturday and I had to figure out a no-fuss, yet rather light summery appetizer to take along.  I know I had a tray of shaved beef in the freezer. Since one of my kids has more or less sworn off beef, I figured I could use the meat for an appetizer.

After a mental run down of what seemed like dozens of ideas, I decided on a summery, citrusy salad that could be eaten as a finger food. Ah, what better vehicle to hold the salad than crispy wonton shells! Have you tried those? I must say, this was my first time and I was quite impressed! The shells remained partially crisp the next day, even after a light drizzle of the delicious citrusy-Asian dressing.

It is super easy to make the shells. Just spray a muffin pan and gently mold a wonton wrapper into a general cup shape and bake at 350F for about 7 minutes or so. Similarly, shaved beef is super easy to cook. Fast too! Just season with whatever – in this case, an Asian-inspired marinade, and just saute for a few minutes.

20150613_125804

The salad dressing, which probably is the best part of this entire dish, is a simple combination of lemon juice, honey, teriyaki sauce, few drops of dark sesame oil and a dash of salt and pepper.

20150613_131137

Just layer on the salad ingredients and drizzle the dressing right before serving. These cups were a huge hit at the gathering and people raved about the dressing. Addition of lemon zest does take it a whole new level, so don’t hold back on it!

20150613_150435

So, what are you waiting for? Get ready to impress your friends and family at the next gathering with this super light, yet super delicious Citrusy Asian Salad in Crispy Wonton Shells!

20150613_150452

  • Servings: ”18″
  • Print

Ingredients
18 wonton shells
cooking spray
2 cups of Spring green mix
1/4 cup thinly sliced salad radish
1/4 cup finely minced red peppers
1/2 lb shaved beef
1 tablespoon oil
2 tablespoons reduced-sodium soy sauce
2 cloves garlic, finely minced
1/4 cup finely chopped roasted peanuts
Zest from 1 lemon
Juice from 1 lemon
1 tablespoon honey
2 tablespoons teriyaki sauce
1/4 teaspoon dark sesame oil
2 tablespoons canola oil
dash of salt and pepper

Preparation:
1. Preheat oven to 350F. Spary a muffin pan with cooking spray. Carefully place a wonton wrapper into each of the muffin cups and gently form into shells. Bake for 8 minutes till golden. Remove from oven and let cool in the pan.
2. In a medium frying pan, spoon a tablespoon of oil and heat over medium high heat. Add the beef and quickly stir around till meat is browned. Add the teriyaki sauce and garlic and saute for another 3 minutes. Turn off heat and let the meat cool to room temperature.
3. In the meantime, remove the wonton shells from the muffin pan and carefully arrange them on a large platter. Place a layer of salad greens into each shell. Place about a tablespoon of the sautéed beef and top with radish and peppers. Sprinkle with crushed peanuts. Set aside while you prepare the dressing.
4. In a small bowl, whisk together the lemon zest, lemon juice, teriyaki sauce, sesame oil, canola oil, honey, salt and pepper. Drizzle the dressing over the salad cups right before serving.

Crispy Homemade Fries

20140423_195555

Everyone has a secret indulgence, wouldn’t you agree?! 🙂 One of mine is fries! Not the fast food type, but real good fries that are perfectly crisp on the outside and light and fluffy on the inside. You know the type that I am talking about – the kind that doesn’t get limp and lifeless as soon as you scoop it out of the oil! Yes, that kind!

20140423_184053  20140423_184043  20140423_200126

Yes, yes, I am talking about the deep fried version. Yikes! But once in a while, it’s OK to eat a few of these without any guilt. Of late, I am following the principle of “limit, not restrict”. I feel it works better for me and my family to actually treat ourselves to “normal” food so we don’t feel deprived. Do I over-indulge often?? Of course not! But when I do prepare a not-so-light versions of anything, I allow myself to enjoy them shamelessly within bounds! And hence these fries!

These fries are lightly coated in a very thin batter, drained off of any excess and fried at high temperature so the oil doesn’t get soaked into the spuds. You can hold them in a low-temp oven till you are done with all the batches, so they remain crisp and delicious when it is time to serve!

20140423_201815

Crispy Homemade Fries

  • Servings: 4
  • Print

Ingredients
2 medium size russet potatoes
1/2 cup all purpose flour
1 teaspoon seasoned salt
1/2 teaspoon ground black pepper
1/2 teaspoon salt
1 teaspoon paprika
1/2 teaspoon garlic powder
1/2 teaspoon onion powder
1/4 – 1/2 teaspoon cayenne powder
1/4 teaspoon baking soda
3/4 – 1 cup cold water
Oil for deep frying

Preparation
1. Vigorously scrub the potatoes and rinse under cold water.
2. Slice them into long strips, about 1/4 inch wide on all four sides (or slightly bigger). Cover them with cold water (feel free to add few ice cubes) and let stand for about 20 minutes or so.
3. While the potato is standing in water, prepare the batter by mixing the flour with all other ingredients, EXCEPT the oil. Adjust the seasonings as desired. Batter should be fairly thin to coat the spuds and easily drip off.
4. Drain the potatoes and pat them dry with a kitchen towel or paper towel.
5. Heat at least an inch deep of oil in a shallow frying pan over medium-high heat.
6. Dip the potato strips lightly in the prepared batter and let any excess drip off. Do this one at a time. Drop them into the hot oil. Fry for about 5 minutes, turning occasionally till the fries are golden brown and crisp.
7. Transfer the fries to a baking tray in a preheated warm oven (about 200-225F) till you are done frying everything. Serve immediately.