Oven Roasted Spicy Chickpeas

20181124_182912
I love chickpeas – drained, rinsed and tossed in a variety of salads, transformed into a luscious channa masala curry and so on. While plain chickpeas are easy to drain out of a can onto a salad, roasted chickpeas elevate themselves to another level!

Roasting canned chickpeas may sound like a major undertaking, but it really isn’t. The hardest part is probably breaking away from whatever you are doing every 15 min or so to toss the chickpeas around so they roast evenly.

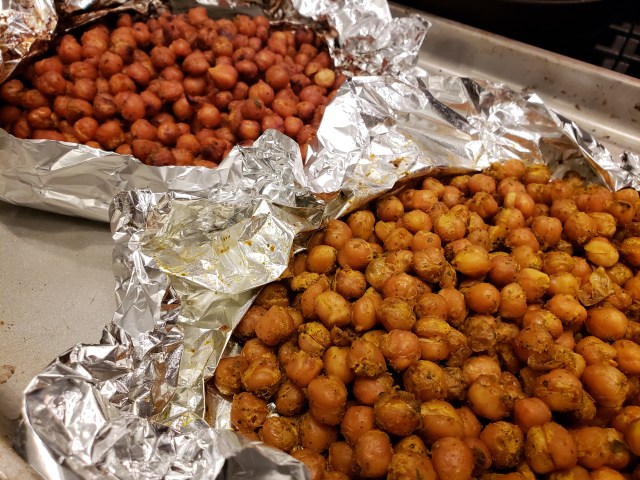
Despite how ridiculously easy this recipe is, the most exciting part is myriad of ways to season the chickpeas. You can literally use whatever flavors, spices or seasoning mix you want. Just choose what your heart desires along with couple of tablespoons of oil for a 29oz can of chickpeas. You can always divide the chickpeas into smaller amounts and use different seasonings – you just need to keep them separate while baking. I used spicy seasoning mixes, and hence these are roasted spicy chickpeas. I baked two batches, one with gochujang (Korean chili paste seasoning) and prepared zhoug sauce (it’s a Mediterranean sauce with cilantro, chili and spices and tastes very similar to Indian cilantro chutney. I bought mine from Trader Joe’s). Both types of roasted chickpeas were pleasantly flavored with very distinct flavor profiles which helps add variety to my salads this week (but geez, with the recall of romaine lettuce and all salad mixes containing romaine, it’s going to be a bit challenging to whip up quick salads. Kale anyone?!)

20181124_182918

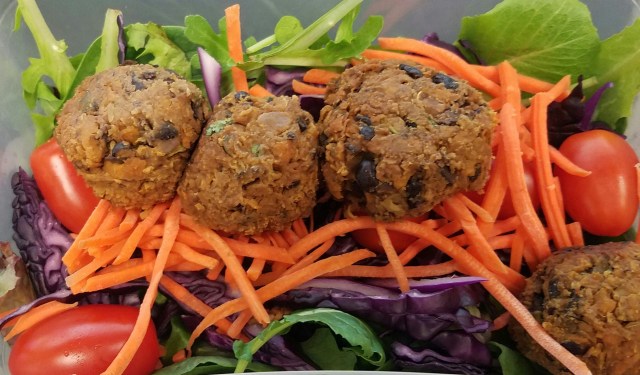
Roasted chickpeas won’t really have the same texture as store-bought ones in sealed packages. They tend to have a very crisp, hard texture. These home roasted chickpeas have a bite and are on the chewy side – in my opinion, perfect texture for a salad or snack.

20180805_200928

Oven Roasted Spicy Chickpeas

  • Servings: Each 29oz makes about 6-8 servings
  • Print

Ingredients:

Two 29oz cans chickpeas

Seasoning 1

2 tablespoons zhoug sauce (Trader Joe’s)
1/4 teaspoon cayenne powder
1/4 teaspoon turmeric powder
Salt to taste
1 tablespoon oil (less oil due to the oil in the zhoug sauce)

Seasoning 2

2 tablespoons gochujang paste
2 tablespoons olive oil
Salt to taste
1/2 teaspoon garlic powder

Preparation:
1. Preheat oven to 325F. Line two cookie sheets with parchment and set aside.
2. Drain and rinse chickpeas from the two cans and divide among two medium sized bowls.
3. Add seasoning mix 1 and 2 to the bowls (of course, separately). Toss to coat well.
4. Transfer the chickpeas to the baking trays and bake for 45 to 60 minutes, taking care to check on the chickpeas every 15 minutes.
5. Chickpeas will look and feel dry when done. Remove from oven and let them cool completely. Transfer to airtight containers and refrigerate. It will taste great at least for a week.

Blackbean and Veggie Falafels

20181021_191709
I am glad to admit that I am not a purist. There is something a bit more personal and exciting about bending the norms a little. At least in the food we enjoy! Think about it…if you always followed the same cake or casserole recipe, won’t you be bored? That’s when we get creative with tossing in a little bit of this and that or “wing it” along the way.

These falafels are the result of going with the flow and keeping my fingers crossed that they won’t be a crumbly or horrible tasting mess. Inspiration for this recipe, which uses cauliflower, sweet potato and black beans came from watching the recent trends with cauliflower everything, including pizza crust! PIZZA CRUST! If cauliflower could be a pizza crust, it better be a darn good falafel. And it delivered!

Honestly, these falafels are a winner not not because they have a good doze of veggies, but also because they are oven-baked with a light drizzle of oil and not deep fried like the traditional ones. What is not to love about it, right?! These delicious bites held their shape, stored well for few days refrigerated and made a perfect match as a salad topper or filler for a pita. So, go ahead and make a batch! You can drop a thank you note later! 🙂

20181028_192913

Blackbean and Veggie Falafels

  • Servings: 18-20 falafels
  • Print

Note about Prep Time: Prep time is about 20 min, refrigeration for about 30 min and cook (bake) time about 45 min.

Ingredients:

1 1/2 cups grated cauliflower

1 1/2 cups grated sweet potato

1/4 cup finely chopped onions

3 cloves of garlic, finely minced

1 heaping teaspoon smoked paprika

1 tablespoon coriander seeds

1 teaspoon cumin seeds

1/4 teaspoon cayenne powder

Salt to taste

1 14.5oz black beans, drained and rinsed

1/4 cup chickpea flour

1 – 2 tablespoons olive oil

Preparation:

  1. Dry roast coriander and cumin seeds for 5 min over low heat and grind to a powder in a dry grinder or in a mortar and pestle. Set aside.
  2. In a saute pan, add 1 teaspoon olive oil and saute the vegetables, including onion and garlic. Add the ground spices, salt, paprika and cayenne. Let cool.
  3. In a medium bowl, mash the drained blackbeans. Add the vegetable mixture and chickpea flour and thoroughly mix in. Cover and refrigerate for about 30 minutes.
  4. Preheat oven to 400F.
  5. Take the refrigerated falafel mixture out and form into about 1 to 1 1/2 inch balls.
  6. Arrange on a parchment lined baking tray and drizzle with remaining olive oil.
  7. Bake for about 25 min. Turn over and continue to bake for another 20 min till firm and golden.
  8. Serve immediately in a salad or as a wrap. Refrigerate remaining falafels.

South-East Asian Style Vegetable Fried Rice

20141202_175013

There are myriads of recipes for fried rice. I personally love fried rice of any type or ethnic origin. This particular recipe is a blend of Indian and Sri Lankan flavors and textures.

Sri Lankan recipes typically will call for pandan (rampe) leaf which is not easily found in grocery stores in the US (although you can find them quite easily in Ontario, Canada). They impart a very distinct flavor to the rice and meat dishes. In the absence of pandan, I used mint leaves in this recipe, making it more Indian. In addition, Sri Lankan version is sometimes topped with bread cubes sautéed in clarified butter (aka ghee). They add a nice chewy texture and a unique flavor to the rice! When I was a child, I remember hunting for these bread cubes in my rice!

20141202_180331  20141202_175240  20141202_181219

This is a wholesome vegetarian dish that could be served with Indian/Sri Lankan curries or a simple yogurt/cucumber relish or just plain yogurt. It is pretty straightforward to prepare – the most involved step is making the spice mixture. If you are crunched for time, you can easily use frozen vegetables in place of fresh (like I did in this recipe) without sacrificing the flavor.

20141202_182122  20141202_183806

I hope you give this a try!

20141202_192033

South-East Asian Style Vegetable Fried Rice

  • Servings: 6-8
  • Print

Ingredients
2 cups Basmati rice, rinsed and soaked in cold water for 15 minutes
1 teaspoon oil
1/2 onion, sliced thick
2 Thai green chili pepper
3 cloves of garlic, cut up
1/2 inch piece of ginger, cut up
2 large tomatoes, cut up
1/2 cup loosely packed mint leaves
1 tablespoon butter
1 tablespoon oil
1/2 onion, sliced thin
2″ long cinnamon stick
3 cloves
2-3 cardamom pods, lightly bruised (if available)
1/2 bag (8 oz) frozen mixed vegetables (carrot, green beans and peas or something similar)
1/2 teaspoon turmeric powder
1 tablespoon Madras-style curry powder, optional
Salt to taste
1/4 cup mint leaves, chopped up
2 slices of bread, cut in cubes and pan toasted in butter

Preparation
1. Begin by cooking the rice according to directions.
2. While the rice is cooking, heat a teaspoon of oil in a shallow frying pan and saute thickly sliced onion, chili, garlic and ginger. When the onion begins to get golden, add the tomatoes and mint leaves. Saute for few more minutes and remove from heat.
3. Using a hand blender or food processor, grind the above till smooth. Set aside.
4. Heat a skillet over medium high heat and add butter and tablespoon of oil.
5. Add the thinly sliced onions and saute till golden. Add cinnamon, cardamom and clove.
6. After a few seconds, add the frozen vegetables and turmeric powder and saute till the vegetable are cooked through and the carrot looks slightly caramelized.
7. Stir in the curry powder, ground spice mixture and salt to taste.
8. Continue to cook for another 5 minutes or so till the mixture is cooked through and the oil starts to separate along the edges.
9. Mix in the cooked rice along with fresh mint.
10. Top with bread cubes and serve with a curry of your choice, boiled egg or yogurt (or a combination of all!).

Pan-Cooked Southwest Quinoa Patty

20140430_200548

Quinoa has come a long way from its humble beginnings! What used to be a trendy food item of the ultra-health conscious folks, has now become a near staple in many a household – thanks to its nutty texture, delectable taste and most importantly its high nutritional value!

I use quinoa in salads, as a replacement for rice for serving with curries, as breakfast cereal and now as quinoa “burger” or patty.

20140430_200326

You can season these patties with your favorite combination of spices, herbs and other add-ins. I prefer the spicy notes imparted by southwest flavors of peppers, cilantro, citrus etc. and so decided to make these patties with those flavors! I used minced red peppers and zucchini to the patty mix. Needless to say, these ingredients add specks of bright colors and also boost the nutritional value. Addition of cheese not only gives a nice taste, but also helps in the holding power of the patty. As you may already know, cooked quinoa is rather fluffy, individual grains. Even with mashed black beans, you will still need the cheese in there for the best texture. I did make a few without cheese. They came out great, but I had to be extra careful not to break them while flipping or removing from pan. Lastly, even with cheese, be careful handling the patties. They are a bit fragile but so worth it when it comes to taste.

20140430_142723  20140430_143842 20140430_144759

Lastly, you can use any type of quinoa for these patties (red, regular white, a combination etc). Also, you could substitute cannellini beans (or may be even navy beans) for the black beans in this recipe. Since I used regular canned black beans (not unsalted or reduced sodium), I could get away with just 1/2 teaspoon of salt. If you are unsure of the spice amounts, taste the mixture BEFORE adding eggs so you could adjust the seasoning. I did and boy was the mix delicious even at that stage! Would make a yummy dip baked with some cheese on top. Next time!

20140430_144959

The formed patties can be frozen. Just pan “fry” them straight from the freeze under a low temp so the inside gets cooked through without burning the outside.

20140430_150113  20140430_194218

Pan-Cooked Southwest Quinoa Patties

Ingredients
2 to 2 1/4 cups cooked and cooled quinoa
2 eggs
1/4 cup finely minced red onions
1/2 cup finely chopped red pepper
1/4 cup diced zucchini
1 jalapeno pepper, minced finely (remove seeds if desired)
1 1/2 cups black beans, drained and rinsed well
3 cloves of garlic, grated fine
1/4 cup finely chopped cilantro
1 teaspoon ground cumin
1/2 teaspoon ground coriander
1/2 teaspoon salt
1/2 teaspoon paprika
1/4 cup panko bread crumbs
1/2 cup reduced fat sharp cheddar cheese, grated
2 – 3 tablespoons olive oil

Preparation
1. Mix quinoa and all other ingredients EXCEPT oil thoroughly.
2. Divide the mix into 10 equal portions and flatten on parchment lined baking sheet into patties about 4-5″ in diameter and about 1/2″ thick.
3. Place the patties in single layer on a platter and chill for at least 30 minutes. Alternatively, you can just chill the mix and form the patties immediately prior to cooking them. To do this, just take a ball of mix and flatten on palm of your hand and gently and carefully transfer it to the frying pan.
4. Heat a frying pan over medium heat and add a tablespoon of oil. Swirl to coat and place patties in the pan.
5. Cook for about 6-8 minutes. Carefully turn the patties on the other side and continue to cook for another 5-7 minutes. Extended cooking results in a golden and crispy exterior while ensuring the inside is cooked thoroughly.
6. Hold in a warm oven or toaster oven till ready to serve.

TIPS:
1. If serving the patties assembled as burgers, proceeds as you would with any meat patty.
2. If serving at a later time, freeze uncooked patties after their initial “chilling” period in the refrigerator (for easier handling). Wrap individual patties in clear plastic wrap and store in a zip top bag or other airtight container. Pan “fry” frozen patties under low heat to help thaw the inside and increase heat to finish cooking and ensure proper internal temperature.