Sweet and Tangy Turkey Meatballs

20190203_161112
What is it about a blend of tastes – sweet and tangy, sweet and spicy…Flavor combos like these are always extra intriguing to the palette! Such was the inspiration for this dish…healthier ground turkey, seasoned with a blend of spicy jalapeno (mmm…would love to try the recipe with habanero next time around), sweet mango, citrusy note of lemon zest and freshness of cilantro!

This recipe is a nice change from the traditional beef meatballs in red tomato sauce, or if you are a bit more adventurous Swedish meatballs! While you could serve these meatballs as little cocktail bites, mixed with some veggies like carrot and simmered in some liquid, these could also double as a topper for some hot cooked rice or pasta. These would even be great with a side of steamed veggies if you want to go light on the carbs!

20190203_155046

These meatballs are super easy to whip together. Yeah, it takes a bit of a prep – sauteing the onion and peppers, making the meatballs, browning them, and then simmering them in the sauce, but the effort, in my opinion, is worth it! They are very tender and delicious, with just a little note of heat and sweetness.

20190203_180058

Sweet and Tangy Turkey Meatballs

  • Servings: 4-5
  • Print

Ingredients
1 lb lean ground turkey
1 tablespoon oil, additional 2 tablespoons
3 cloves of garlic
1/4 cup of finely chopped red onion
1 jalapeno, finely chopped
1/4 cup old fashioned oats
1/4 cup finely chopped sweet, ripe mango
1 tablespoon lime zest
1-2 tablespoons finely minced cilantro
1/2 teaspoon salt
1 egg, lightly beaten
1/3 cup plain breadcrumbs
1 large carrot, chopped (about 2 cups)
1/3 cup orange marmalade

Preparation:
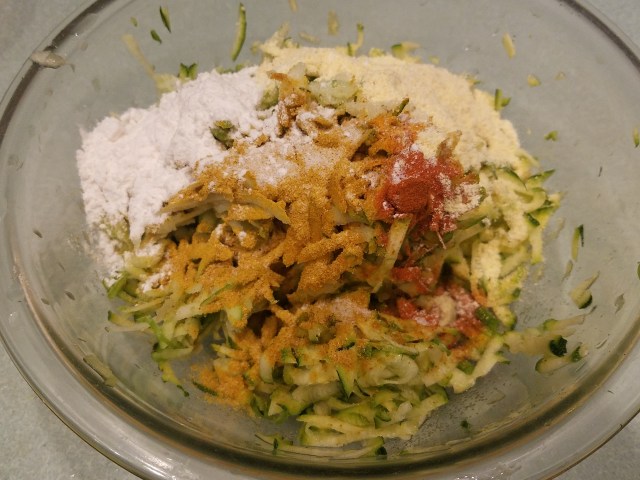
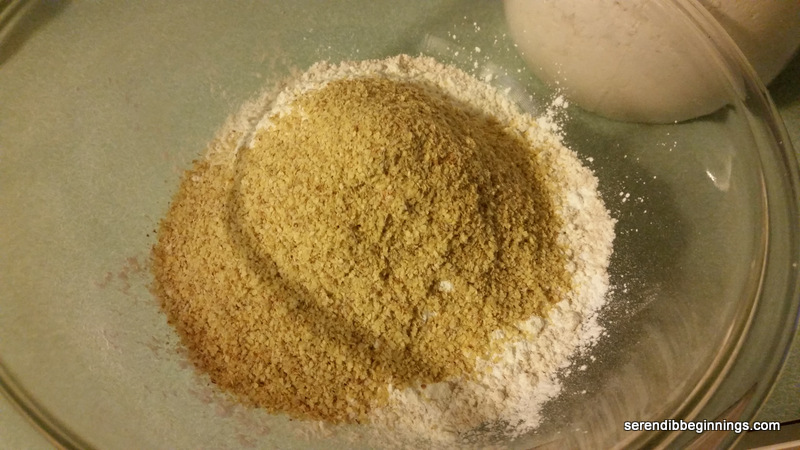
1. Heat one tablespoon oil in a skillet and saute onion, garlic and jalapeno till golden. Take care not to burn. Add the oatmeal and continue to cook for another 2 minutes.
2. In a medium bowl, combine turkey, sauted mixture from above and all remain ingredients through breadcrumbs.
3. Form into 1″ balls.
4. Heat 2 tablespoons of oil in a large skillet and brown the meatballs on all sides. Remove to a platter. Note that the meatballs will not be cooked all the way through, so please resist the temptation to bite into one (though you will really be tempted!)
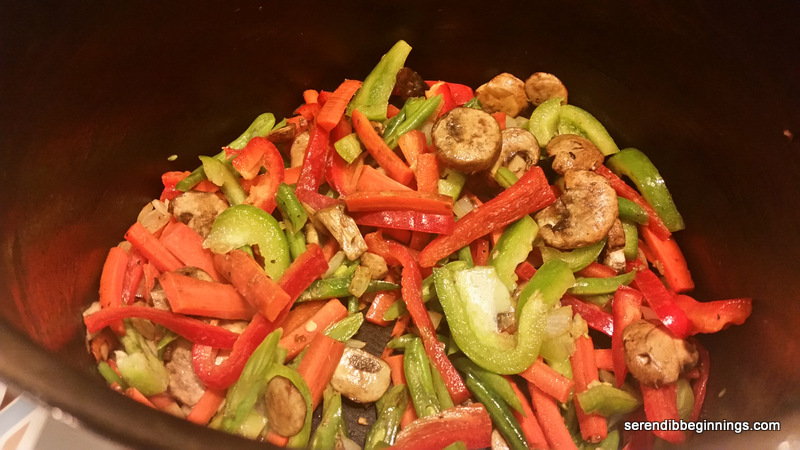
5. In a medium sauce pan,add a teaspoon of oil and saute the carrots for 5 minutes. Add 1/2 cup of water and a bit of salt to taste. Stir in the orange marmalade and drop the meatballs into the pan. Gently toss to coat, cover and cook for 15 minutes, till the carrot is tender and sauce is a little thick.
6. Serve the meatball with rice, pasta or steamed veggies.

Oven-Fried Chicken Thighs

I am not going to make yet another apology for being ridiculously tardy with my postings, so I will just jump to the recipe at hand!

20180219_184133[1]
Do you like fried chicken? Me neither! It’s not that it’s not yummy or satisfying. It sure is! The reason I don’t like it is because it is so damn bad for you…like looking at it on your plate makes you want to grab your chest like you can somehow feel the arteries getting clogged! Real fried chicken is definitely full of fat and calories – store-bought/ commercially prepared chunks likely brim with thousands of calories and more than a few days worth of saturated fat. So, yes, I don’t like them. I never order these from restaurants, but on a rare occasion, I do fantasize about biting into one with no regrets!

20180219_173312[1] 20180219_173428[1]

Hence, this attempt at making an oven-fried version, which will not make it to any healthy dish list, but at least satisfies one’s annual craving for fried chicken without a whole lot of guilt. I wanted to emphasize a few words in the previous sentence as this chicken is still an indulgence in my opinion. Although I carefully trimmed out most of the excess fat and good portion of the skin, there is still some of that bad stuff on the chicken. In addition, even though I skipped the deep frying, there is still some oil drizzled on the chicken before baking. So, all in all, please do indulge and enjoy this dish, but try with all your might to only make it on a rare occasion or two.

With that out of the way, this chicken is truly delicious. Marinating the meat in seasoned buttermilk (in my case, 1% milk soured with a bit of white vinegar) for 24 hours goes a long way in making sure the chicken tastes well seasoned and comes out juicy and delicious. Seasoning the flour mixture adds another layer of seasoning that makes the exterior of the chicken delectable as well. I debated going with just all-purpose flour, but then opted for a “house blend” of all-purpose, cornmeal, rice flour and cornstarch. In case you are wondering how I came up with this blend, honestly, 100% on a whim. I figured rice flour and cornstarch tend to make things crispy,cornmeal adds bit of a textural element and all-purpose flour, well, it’s “all-purpose”. I think this is a keeper! After all the waiting around with the marinating and long baking time, this recipe proved to be a winner. And the chicken tastes great even the next day!

20180219_184138[1]

Oven-Fried Chicken Thighs

Ingredients:
8 chicken thighs, excess fat and skin trimmed carefully; deeply score the skin side
Marinade:
1 cup buttermilk (or sour milk made with a cup of milk and 1 tablespoon vinegar)
1 teaspoon salt
Cayenne powder to taste (I used about 3/4 teaspoon)
few grinds of freshly ground black pepper
1/2 teaspoon each, onion powder and garlic powder
Flour mixture
1/4 cup each all-purpose flour, rice flour, cornmeal and cornflour
Cayenne powder to taste (I used about 1/2 teaspoon extra hot)
1/2 teaspoon salt
Generous sprinkle of freshly ground black pepper
1/4 teaspoon onion powder
1/2 teaspoon garlic powder
1/2 teaspoon paprika
2 tablespoons minced fresh parsley leaves
2 tablespoons canola oil
cooking spray

Preparation:
1. Blend all marinade ingredients. Pour over chicken thighs arranged in a baking dish, cover with plastic wrap and refrigerate overnight or up to 24 hours.
2. Preheat oven to 425F.
3. In a medium bowl, combine the flours with ingredients through parsley leaves.
4. Remove chicken pieces from the marinade. Blot dry (I skipped this step because I was in a mad dash to the next step for no real good reason).
5. Toss the chicken pieces one at a time in the flour mixture until well coated. I even made sure some of the flour mixture got in between the slits on the skin side.
6. Arrange the coated chicken pieces on a baking tray lined with aluminum foil, skin side up.
7. Cover the chicken pieces with a good coating of cooking spray. Drizzle the oil evenly over all the chicken pieces.
8. Bake for 40 to 45 minutes till juices run clear and the chicken is cooked through.
9. Serve with sides of your choice (Tip: a good serving of vegetable should at least take some of the guilt off!) Enjoy!

Zucchini-Apple Fritters

20171020_150332
What a glorious weekend, but where’s autumn!?

20171018_192002

As the long summer days wound down, I was kind of excited about welcoming the glorious colors of fall! Bright hues of red, yellow, orange and brown with quickly fading greens bursting in the canopies! But, fall splendor seems to be quite elusive this year!

20171018_183250

Despite the lack of the autumn chill, I still had the timely craving for something comforting and delicious to enjoy! My appetite is so predictable! Anyway, my craving for some homemade hashbrown (potato kind), eggs and bacon didn’t really stick. For once, I convinced myself quite easily to try to make something a little lighter and healthier. As I made a mental run of things in the refrigerator, I paused at zucchinis and Granny Smith apples.

20171018_184706

I decided to make some sort of a fritter using zucchini and apple, but without any eggs. I made a version of these with eggs, and decided I am not a big fan of egg-y fritters. If you like crispy texture, you will probably not enjoy this the way I made it – unless you coat it with breadcrumbs and bake/fry. These fritters (“hashbrowns”) are sort of creamy, sort of soft, sort of pate-ish. Not sure how to explain them, but they are delicious. They are very light, so you can easily eat half the fritters…and it’s OK if you do because they are, in my opinion, quite healthy! Curry powder adds a certain depth to these fritters and I highly recommend you use them. But, if you don’t have it in your pantry, you can skip it.

20171018_184820

These fritters are quite versatile. They will go well with eggs for breakfast or with rice and curries for a main course or just a little snack! I also stored leftovers for couple of days in the refrigerator and they warmed up beautifully in the microwave. Hope you give this recipe a try!

20171018_190404

Zucchini-Apple Fritters

  • Servings: 4-6
  • Print

Ingredients
2 zucchinis, grated
1/2 Granny Smith apple, grated
2 scallions, green and white part minced finely
1 teaspoon finely minced ginger
1 teaspoon curry powder
1/4 cup cornmeal
2 tablespoons all purpose flour
1/4-1/2 teaspoon of cayenne powder, if desired
Salt and pepper to taste
Few tablespoons of oil to pan fry the fritters

Preparation
1) Squeeze excess water out of the grated zucchini and apple and add to a medium bowl.
2) Add in the remaining ingredients and mix well by hand. This helps breakdown the ingredients a little so they are easy to form into little patties later on.
3) Let the mixture sit for 10 minutes to let the cornmeal and flour soak up any excess liquid.
4) Heat a frying pan over medium heat and a tablespoon of oil. Swirl around to coat.
5) Form the mixture into golf-ball sized round. Place a few in the pan with enough room around them so you can flatten the balls into small disks, about 3″ wide.
6) Cook on one side for 2 minutes or so till golden brown. Flip carefully onto the other side and cook for another 2 minutes. Remove to a serving platter and enjoy warm.

Pan-Grilled Tilapia with Garlic Rainbow Chard

20151031_194819

I love greens! Spinach, kale, collard, mustard…but I had never tried chard before! So, I was super excited when a colleague brought in a couple of bags of “excess” produce that she had from her membership in the CSA (Community Supported Agriculture). My “loot bag” included a large earthy turnip, a big bag of peppery arugula and a beautiful bunch of sweet rainbow chard! I must say, there is something about the rainbow chard…its deep green leaves with colorful veins and stems in purple, orange and green is definitely a thing of beauty!

20151031_190421  20151031_190625

Driving home, I made a mental note of how I was going to use up all that beautiful, fresh produce! I decided on South Indian style mixed vegetable and lentil stew (sambar) with the turnip, thin crust pizza (I used a prebaked crust made of whole wheat and kamut flours) with pesto, mushrooms and arugula and…tilapia with rainbow chard sautéed in extra-virgin olive oil with a healthy doze of minced garlic!

20151031_191206  20151031_192149

This tilapia/rainbow chard dinner is a snap to prepare. It requires very few ingredients and takes about the same time as watching a pot of water come to boil and cooking a box of pasta! Instead of a bowl of plain, cooked pasta in less than 20 minutes, you get a beautifully plated! I sort of missed the summer BBQ flavors and opted to go with that for this dish! The chard is super simple to make – just garlic, pinch of salt and bit of olive oil! I think the green is so delicate that anything beyond this simple combo might just overpower its natural flavor and taste!

20151031_194847

Isn’t everyone talking about the health benefits of eating fish! So, go for it! Grab yourself a few filets and whip up this dinner in a snap!

Pan-Grilled Tilapia with Garlic Rainbow Chard

  • Servings: 4
  • Print

Ingredients
4 Tilapia filets, skin removed
1 tablespoon BBQ seasoning or other seasoning of your choice
1 tablespoon olive oil
1 bunch of rainbow chard, chopped up
3 large cloves of garlic, finely minced
1 tablespoon extra virgin olive oil
Pinch of salt

Preparation
1. Lay the tilapia filets on a large plate and coat both sides with the BBQ seasoning.
2. Heat a tablespoon of oil in a large skillet over medium high heat.
3. Place the fish in the hot skillet and “grill” for 4-5 minutes on each side. The fish is done when you can flake it easily with a fork.
4. Wipe down the pan and return to heat. Add the remaining tablespoon of oil. Add the rainbow chard and garlic and saute for 3-4 minutes.
5. Serve the fish immediately over a serving of sautéed chard for a simple, healthy and delicious meal!

Coconut Curry Soup with Chicken and Vegetables

20150622_203129

True it is July and there is just a glimmer of hope that it might actually start to feel like summer, but that shouldn’t stop you from wanting a comforting bowl of soup for a meal, right?! Well, let’s just assume that’s the case! I know a bowl of soup sounds far more inviting in the cold and dreary winter months, but hey, with this intensely flavored bowl, you might actually feel like you are vacationing somewhere in Thailand or Sri Lanka! 

20150707_180818  20150707_181907

The idea for this recipe originated from a lunch break conversation with a colleague who was longingly taking out a warm bowl of homemade soup from the microwave. It smelled great and she went on to add that she was so sad that her last bit of soup made in bulk was going to be consumed! She quickly summarized the recipe for me while I made a mental note of just three things – curry powder, coconut milk and whatever you want to throw in to make it a meal! I also remembered with a smile a small Ziploc bag of kefir lime leaves that I had in the freezer from an online purchase eons ago! I knew adding that would mean I would get an addictive aroma of combination of curry, coconut and citrus! What not to love about this, huh!

20150707_183439  20150707_184319

I didn’t have to wait around to make this recipe. I had all the ingredients on hand – you think it is weird? 🙂 Especially those kefir lime leaves! Oh well! By the way, for those of you who wish to avoid meat, you can easily substitute the chicken with tofu and the chicken broth with vegetable broth. I think that in essence will make this recipe vegan! A really delicious one!

20150707_191411

So, armful of assorted vegetables, a small tray of chicken thighs and a little of this and that, voila, the recipe was concocted in a flash! Seriously, don’t let the list of ingredients discourage you from trying this out. It is really a snap to whip up and the end result is….honestly, I think you should just make it and tell me yourself!

20150622_203138

Coconut Curry Soup with Chicken and Vegetables

  • Servings: 6
  • Print

Ingredients
6 chicken thighs, skin removed
Salt and pepper to season the chicken
2 tablespoons canola oil, divided for use
2 large carrots, peeled and sliced into 1/4″ inch thick slices
1/2 large red pepper, sliced into 2″ strips
1/2 large green pepper, sliced into 2″ strips
1 cup sliced mushrooms (button or baby bella)
1/4 cup diced onions
2 cloves garlic, finely minced
1 tablespoon mild or medium curry powder
2 kefir lime leaves, zest of 1 lime OR 2″ piece of lemon grass, crushed
Zest from 1 lemon
Juice from 1 lemon
1/2 cup thick coconut milk
1 32-oz container chicken or vegetable broth
1 cup of water
2 tablespoons of soy sauce
Dash of crushed red pepper, optional
3 corn on the cobs, cut in half (optional)
1 cup of cooked noodles (rice or Udon preferred) – Optional

Preparation:
1. Season chicken pieces with salt and pepper and set aside.
2. Heat a large, heavy bottom pan over high heat and drizzle a tablespoon of oil. Place the chicken thighs in a single layer and brown on all sides. Remove from pan and set aside.
3. Add the remaining oil to the same pan and add the vegetables, including onion and garlic and saute for a few minutes.
4. Stir in the curry powder and cook for another minute or two till the raw smell of the curry powder fades away. Add in the browned chicken pieces.
5. Slowly add the chicken broth, water and soy sauce. Adjust the amount of soy sauce to your taste. Add in the kefir lime leaves, lemon zest and lemon juice. Cover the pan with a lid, reduce heat to medium and let the soup simmer for 30 minutes till the chicken is cooked through and vegetables are tender.
6. Reduce heat to low and slowly stir in the coconut milk, reserving a few tablespoons to top the soups before serving.
7. Serve hot with some noodles (if using) and a sprinkle of chopped cilantro.

You can refrigerate any leftover for consuming later. Just know that when you reheat, the soup may look a bit “split” because of the coconut milk trying to separate from the soup. The taste will still be great!

Super Crown Muffins


20150213_083008

Baking is one of my favorite ways to start my day! It doesn’t matter what day of the week it is – if I get the desire, I jump to action, pulling out the staples while thinking about the flavors or the mix-ins.

20150209_071820Even though they mostly turned out deliciously moist and flavorful, I was never fully impressed with how they looked. For every batch I pulled out of the oven, my hankering for perfecting the beautiful super crowns you see in coffeehouse muffins kept getting stronger! No matter how much I researched on tips and techniques, my heart would sink every time I pulled out a delicious yet flat muffin batch – well, until this week!

20150209_072107

So, you see, I didn’t give up! I kept whipping up batch after batch nearly every week! After all, they do make great after school snack or mid morning pick me upper even if they are flat topped! I tried tweaking an ingredient here and ingredient there, while still trying to keep the end product relatively healthy! Yes, “healthy” is a loosely used term, so let me explain what I mean. These muffins don’t use much added fat (1/4 cup oil for a dozen), use a blend of whole wheat, all purpose and wheat germ, touch of honey and a bit of boost from 1% milk and fat free yogurt! In my opinion, this probably qualifies as relatively healthy compared to what you will pick up at the grocery store or your favorite coffeehouse. And the best part….this recipe is awesome for those of you who want to use few different mix-ins – like the blueberries and chocolate chip versions I made here. Read on to find out more!

20150213_072139

So, unlike what you might read on the internet about having to overfill the muffin pans to achieve the sky-high crown effect, these muffins do just great with about 3/4 fill. They puff up so beautifully that I sometimes catch myself taking a few peeks before they are done! 🙂 And the golden color….You have to try this to experience the joy yourself! So, I hope you will grab couple of mixing bowls and go to task! Enjoy!

20150209_080446  20150209_082600

Super Crown Muffins

  • Servings: 12 muffins
  • Print

Ingredients
1 1/4 cup whole wheat flour
1 cup all purpose flour
1/4 cup toasted wheat germ
1 1/2 teaspoon baking powder
1/2 teaspoon baking soda
1/4 teaspoon salt
2 eggs, lightly beaten
1/4 cup fat free plain yogurt
1/4 cup canola oil
1/4 cup honey
1 cup 1% milk
Add-ins: Chocolate chips, nuts, berries…
Optional: Streusel topping: Combine 2 tablespoons all purpose flour, 1 teaspoon brown sugar, 1/4 cup rolled oats, 1 tablespoon butter, 1/4 teaspoon ground cinnamon

Preparation:
1. Preheat oven to 400F. Grease a 12-well muffin pan and set aside (or alternatively use paper liners)
2. In a large mixing bowl, combine all dry ingredients
3. In a small mixing bowl, combine all the wet ingredients
4. Add the wet ingredients to the dry and gently fold in just until the flour mixture gets moistened. DO NOT OVERMIX!
5. Scoop about a tablespoon of batter into each greased well. Add a few chocolate chips or berries or whatever you choose. Divide rest of the batter evenly among all the wells and top with few more chocolate chips or other add-in of your choice.
6. If using streusel topping, divide it evenly among all the muffins.
7. Bake for about 20 minutes till the crowns are puffed up and beautifully golden!
8. At the end of baking, remove the pan and let the muffins cool for a few minutes before moving them to a cooling rack to cool completely.

You can refrigerate these muffins for 3-5 days. Because of the low fat content, the muffins taste better when you microwave for just a few seconds!

Comfort Pasta with Kale and Ground Beef

20150126_114856

What is it with pasta and the gazillion ways in which you can prepare them! They truly are a star pantry item!

I know I said I am going to try to get back on my healthy wagon, so I think you will appreciate this recipe. Yes, yes, it’s almost the end of January when most of the resolutions fall to the wayside. But, after trying this recipe, eating healthy may not be that difficult after all.

20150126_122005

This recipe is pretty simple, something I concocted while recovering from a mini version of the flu (thankfully short-lived due to Tamiflu). I didn’t quite have the energy to spend an hour in the kitchen, but at the same time didn’t want to be bed sofa-ridden for another meal. So, there I lay making a mental rundown on the items I had on hand, especially the pound of extra lean beef I was going to make chili with before I fell sick.

20150126_122422

So, now that the chili making was off the table till next weekend, I figured I should use up the beef in some form rather than freezing it. Pasta dish it will be! Kale, carrots, mushrooms, beef and a touch of cream and garlic! Simple, yet comforting enough!

20150126_130434

What are you waiting for? Grab the handful of ingredients this recipe calls for and whip up this dish while the pasta cooks! Yes, it is that simple! Go ahead and try it, you might actually end up planning to make it again soon!

20150126_130444

  • Servings: ”4″
  • Print

Ingredients
1/2 package pasta of your choice (I used penne)
1 tablespoon olive oil
2 large cloves of garlic, minced
1/4 cup finely chopped onion
1/2 pound lean (or extra-lean) ground beef
1 small bunch kale, rinsed and broken into small pieces
1 large carrot, peeled and cut into small cubes
2 cups of slices mushrooms
1 teaspoon Italian seasoning
dash of ground black pepper
Salt to taste
1/4 teaspoon freshly grated nutmeg
2 tablespoons of cream
1/4 cup grated parmesan
crushed red pepper, optional

Preparation
1. Bring a large pot of water to boil. Season with salt and cook pasta per directions.
2. In a large pot, heat a tablespoon of olive oil. Saute garlic and onion till translucent.
3. Add ground beef and brown the meat, breaking up any large clumps.
4. Add the carrots and continue cooking for another 5 minutes.
5. Now, add the kale and mushrooms and saute for another 3-5 minutes.
6. Season with Italian seasoning, black pepper and salt per your taste.
7. Add the cream and grate the nutmeg.
8. Toss with pasta and serve with a sprinkling of parmesan and crushed red pepper, if desired.

Grilled Chicken Breasts with Light Alfredo Sauce

20140507_194948Who doesn’t love the creamy deliciousness of Alfredo sauce??!! Yeah, that’s what I thought…everyone does, right! So, you have had Fettucine Alfredo many a time! But how about a grilled chicken breast topped with a lightened Alfredo sauce with notes of garlic and citrus??? We are talking pure indulgence without wreaking havoc with your diet! So, if you are like me and have been on the quest to find a lighter version of this goodness, look no more. I think once you try this recipe, you will agree it’s a keeper.

So, anyway, as you guys already know, typical Alfredo sauce though is loaded with fat (anyone watching their calories out there?). So, Alfredo, like other rich, calorific sauces are usually reserved for extra special occasions, but what if I could enjoy it without any guilt more often than couple of times a year!!

  20140507_185436   20140507_191350  20140507_190405

I do try to make quick white sauces with 1% milk thickened with a roux. Although they impart a slight creaminess, it is definitely not the same as the richer version. This recipe however might change that though once and for all. Little bit of lemon zest, a dollop of reduced fat cream cheese, generous helping of grated parmesan and lots (did I say lots?) of garlic in this sauce provide the satisfying creamy richness without your arteries swelling up with plaque.

20140507_192934  20140507_193032

Drizzle it over grilled chicken just before serving and serve with a side of your favorite vegetable or salad. Trust me, you won’t even miss the bread or other carbs! It is satisfying and will leave you longing to make it again!

20140507_194752  20140507_194930

Grilled Chicken Breasts with Light Alfredo Sauce

  • Servings: 4
  • Print

Ingredients
4 chicken breasts, cut to about 4-6 oz each
salt and pepper to taste
juice from 1/2 lemon
1 clove garlic, finely minced

Sauce
1 1/2 tablespoon butter
3 cloves of garlic, grated or minced finely
1 teaspoon grated lemon zest
1 1/2 tablespoon all purpose flour
1 1/4 cups 1% milk
2 tablespoons reduced fat cream cheese, room temperature
1/2 cup grated parmesan cheese
1/8 cup grated pecorino cheese
3 tablespoons chopped fresh parsley
Salt and freshly ground black pepper to taste
optional – sautéed mushrooms

Preparation
1. Begin by preparing the chicken. Marinate the chicken in a marinade of lemon juice, garlic, olive oil, salt and pepper for about 15-20 minutes.
2. Preheat the grill or a sauté pan at medium high heat. Cook the chicken breasts for 12-14 minutes till juices run clear and meat is cooked through. Remove to a platter, loosely covered with a foil and set aside till you prepare the sauce.
3. In a small sauce pan, melt the butter and sauté the lemon zest and garlic for about 30 seconds. Add the flour and continue to cook, stirring constantly for a minute or so.
4. Stir in the creamed cheese, followed by milk. Stir continuously to break up any lumps. Cook for about 5 minutes till the sauce starts to simmer and thicken up a little.
5. Slowly stir in the grated cheese and season with salt and pepper. Continue to cook for just about a minute or so till the sauce becomes evenly creamy and smooth. Remove from heat and stir in the chopped parsley.
6. Sauce will thicken further as it cools. Therefore, it is best to serve immediately. Spoon desired amount of sauce over the grilled chicken breasts alongside a serving of steamed or sautéed veggies.

NOTE: You will likely have leftover sauce. If so, store in the refrigerator for a day or so. You could thin the sauce by adding bit of milk or cooked pasta water. I mixed my leftover sauce with a tablespoon of homemade light pesto sauce and tossed with cooked pasta for a delicious and quick lunch. My family absolutely loved the leftover as much as their dinner.