Protein-Packed Banana-Date Muffins

20140429_134751

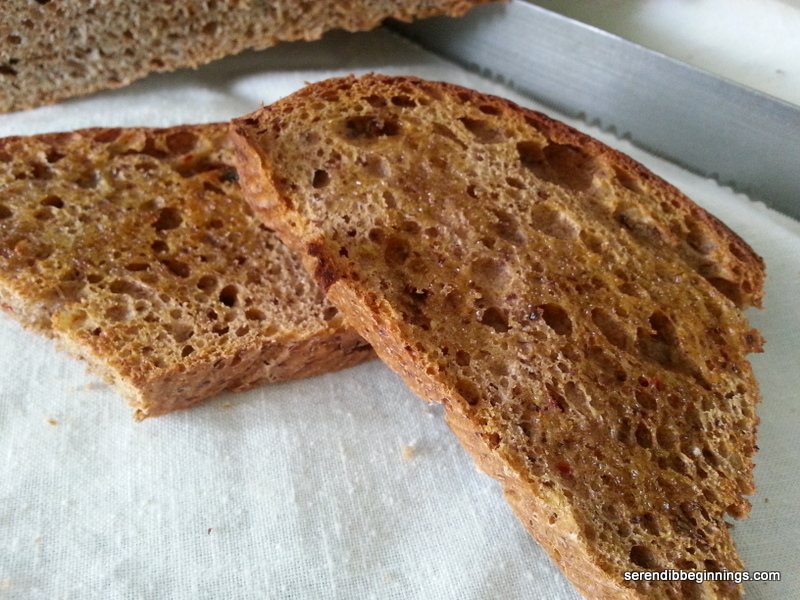
Adapted from a Cooking Light (July 2007) recipe, these muffins were just what I needed to make use of two ripe bananas!

I modified the original recipe by adding in more protein and cutting down on sugar. These muffins use predominantly white whole wheat flour, some soy flour and Greek yogurt. Although the muffins are on the dense side, they are very flavorful and not overly sweet. Banana-date combination yields a wonderful natural sweetness – so much that I might be tempted to cut down the sugar a little more from the 1/2 cup. Best part yet is that these muffins have barely any added oil or butter. Just 2 tablespoons for 16 muffins! Original recipe does not have any though.

20140428_164608  20140428_165943  20140428_165955

These muffins store well for a few days and can even be frozen and thawed to serve for a grab ‘n go breakfast or snack.

If you plan to use Greek yogurt instead of regular plain yogurt, you might want to consider adding few tablespoons of milk to loosen up the batter a bit and add little extra moisture. Since Greek yogurt is double strained, it is much thicker than regular yogurt. I will certainly be adding the extra milk in my next batch. Also, although the original recipe does not mention any flavorings, I think either cinnamon, vanilla or almond extract will round off the flavor of these muffins.

20140428_173259

All in all, a winning recipe and would be keeper! Try a batch and let me know what you guys think!

20140428_173310

Protein-Packed Banana-Date Muffins

  • Servings: 16 muffins
  • Print

Ingredients
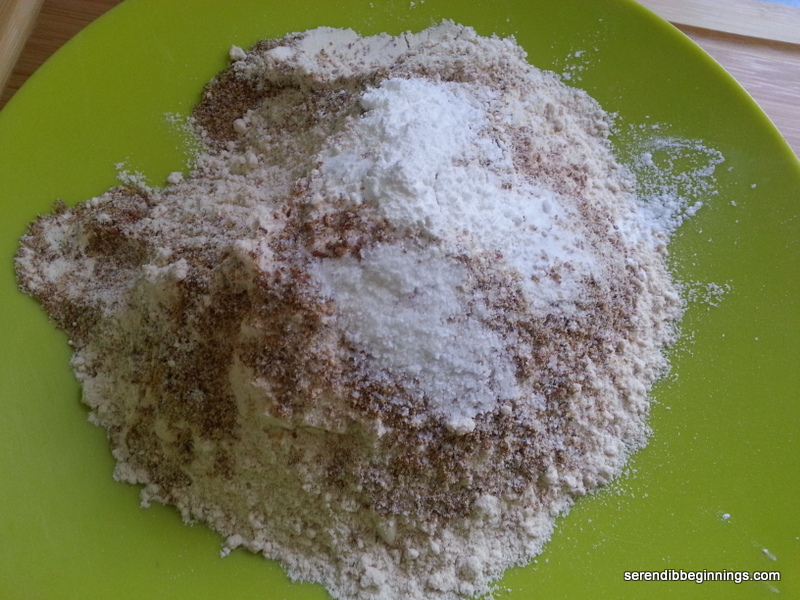
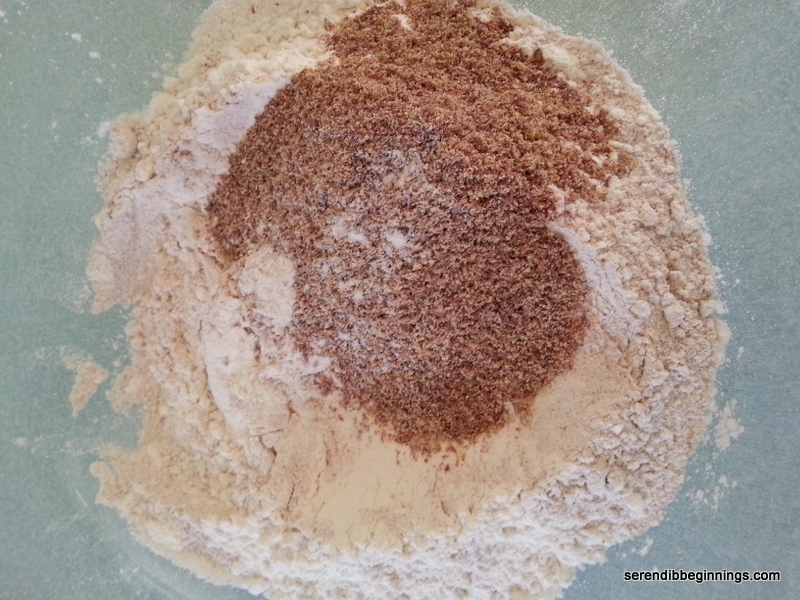
1 cup white whole wheat flour
1/4 cup all-purpose flour
1/4 cup soy flour
1 cup old-fashioned oats
1/2 cup brown sugar
1 tablespoon wheat bran
2 teaspoon baking soda
1/4 teaspoon salt
1 cup yogurt
1 cup mashed ripe banana
1 large egg
2 tablespoons oil
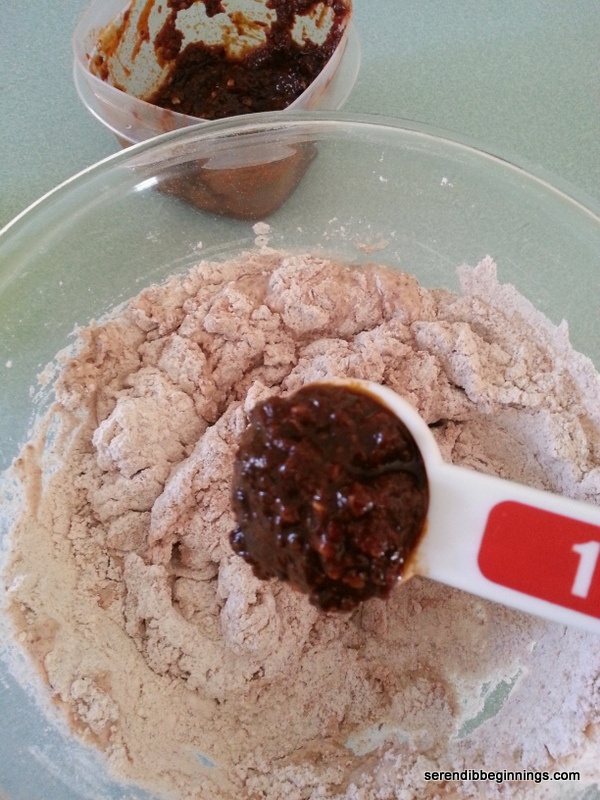
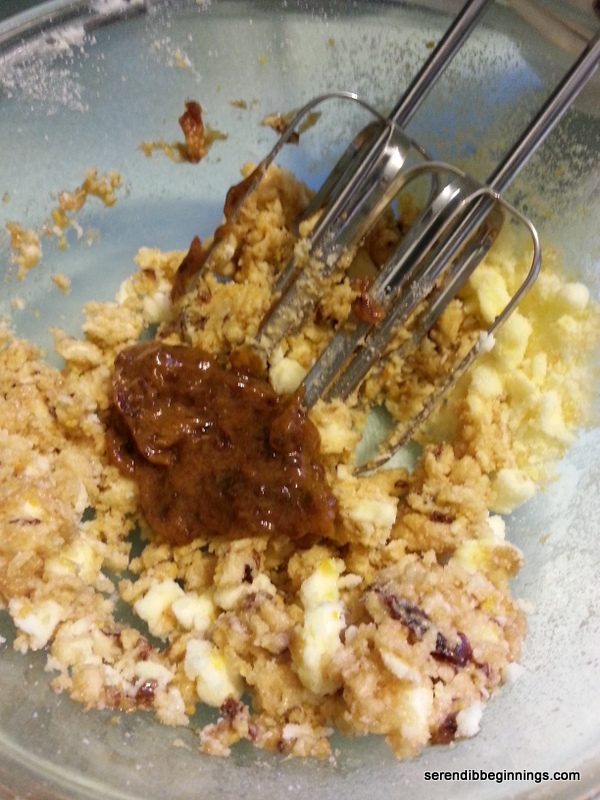
3/4 – 1 cup chopped dates tossed in a tablespoon of flour
1/3 – 1/2 cup chopped nuts such as walnuts, pecans or almonds
3 tablespoons ground flax

Preparation
1. Preheat oven to 350F. Line muffin pan with liners or lightly spray with cooking spray and a dusting of flour.
2. Combine flours with oats, brown sugar, wheat bran, baking soda and salt.
3. Combine yogurt, banana oil and egg.
4. Add liquid mixture to dry ingredients and stir gently to combine.
5. Fold in dates and nuts.
6. Spoon into muffin cups and top with a light sprinkling of ground flax.
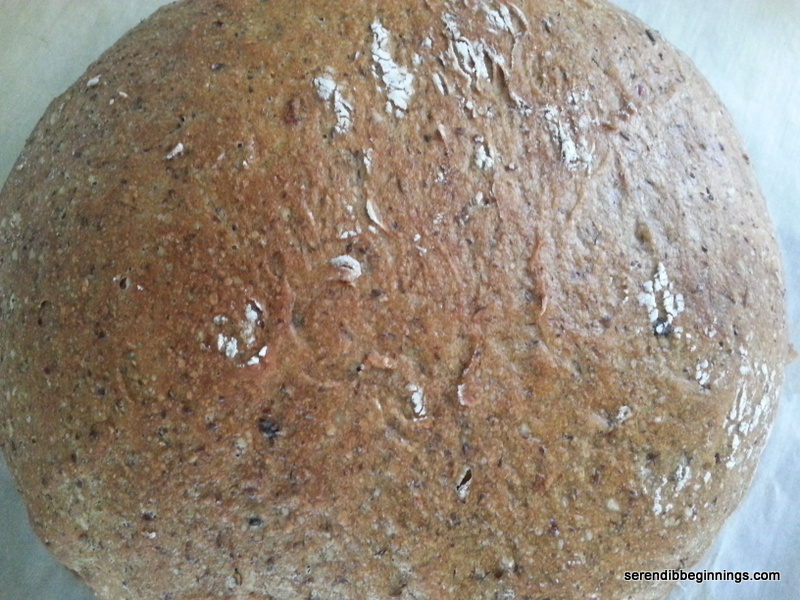
7. Bake for about 20 minutes till muffins are golden brown on top and are baked through.
8. Remove from oven, let stand in the muffin pan for 5 minutes and then transfer to wire rack to cool completely.
9. Store them tightly covered.

(NOTE: Tossing the dates in flour prevents them from sinking to the bottom of the muffins.)

Whole Wheat Zucchini Chocolate Chip Quick Bread

20140416_173633

Don’t you agree zucchini is one of the most underrated vegetables? It has a mild flavor that works well for slicing it up to enjoy with your favorite dip. It’s flavor could be amped by sautéing with garlic and other seasonings. It could be grated into pasta sauces and quick breads as a way to increase the nutritional value without altering the taste.

  20140416_161945  20140416_162635   20140416_162242

Although my kids will eat pretty much any veggie, there are few veggies that I need to be creative with so I don’t have to listen to too much whining. 🙂 Zucchini is one of them! However, this quick bread with grated zucchini and chocolate chips was a winner! Yes, tiny specks of green did give away the hidden secret, they still continued to bite into the bread! This to me means a winning recipe.

20140416_163336

The original recipe is from King Arthur Flour website. I modified it only slightly by replacing some of the flour with ground flax. I did not add any nuts in this attempt, but I would love to throw in some chopped walnuts or pecans in my next batch.

20140416_163551

Give it a try! I think you will enjoy it!

Whole Wheat Zucchini Chocolate Chip Quick Bread

  • Servings: 12 slices
  • Print

Ingredients
2 large eggs
1/3 cup honey
1/2 cup vegetable oil
1/3 cup brown sugar
1 teaspoon vanilla
1 3/4 cups white whole wheat flour
1/4 cup ground flax
1 teaspoon kosher salt
1/2 teaspoon baking soda
1/2 teaspoon baking powder
1 teaspoon ground cinnamon
2 cups shredded, unpeeled zucchini
1/2 cup semi-sweet chocolate chips

Preparation
1. Preheat oven to 350F.
2. Thoroughly whisk eggs, honey, oil, brown sugar and vanilla.
3. Sift together, salt, baking soda, baking powder and cinnamon. Stir in ground flax.
4. Add the dry mix to the wet ingredients, stirring till well combined.
5. Fold in zucchini and chocolate chips.
6. Transfer batter into a 9″ x 5″ lightly greased and floured loaf pan.
7. Bake for 50-55 minutes till top the bread is baked through.
8. Let cool in the pan for about 10 minutes. Then, remove from pan and let cool completely on a wire rack. Slice and serve or store well covered.

Sweet potato pie bread

20140326_144813If you give me a choice between pumpkin and sweet potato pies, I would definitely pick the latter! Not that I don’t like pumpkin, but more like I have a little more love for sweet potato. I enjoy them so much that I can happily enjoy a bowl of plain roasted sweet potato – with absolutely nothing added in!

Sweet potato takes on a whole new flavor dimension and sweetness when you roast them in the oven. You simply scrub and wash them, wrap them in pieces of foil and bake for about 45 minutes at 375F. Voila! You have divinely flavorful bright orange spuds with caramelized sugars oozing out of them!). Roasted sweet potato can be used in soups and other dishes, but I chose to make a quick bread using them. Yes, you can certainly substitute canned version, but as you can imagine, oven roasted spuds taste far superior!

20140325_165835  20140325_163902   20140325_170216

This quick bread has notes of cinnamon, cloves, allspice and nutmeg. Next time, I will also add a bit of ground cardamom for an exotic flair. I replaced half the butter with pureed prunes. This not only reduced the amount of fat, but also added a rich color to the finished product. Also addition of sour cream in this recipe makes the bread very moist.

20140325_181403

Although my kids usually turn up their noses for roasted sweet potato, they devoured this bread. Certainly a keeper recipe!

Sweet potato pie bread

  • Servings: 12
  • Print

Ingredients
1/4 cup butter, softened
1/4 cup pureed prunes
2/3 cup sugar
2 eggs
1 teaspoon vanilla
1 1/2 cups all purpose flour
1 teaspoon soda
1/2 teaspoon salt
1 cut pureed roasted sweet potato
1/2 cup light sour cream
1/2 teaspoon ground cinnamon
1/8 teaspoon ground cloves
1/8 teaspoon allspice
1/8 teaspoon freshly grated nutmeg
1/4 cup finely chopped pecans, optional

Preparation
1. Preheat oven to 375F. Lightly spray a loaf pan and set aside.
2. In a bowl, whisk together butter, pureed prunes and sugar.
3. Add eggs, one at a time, whisking to combine. Stir in vanilla.
4. Combine flour, baking soda, salt and ground spices.
5. Add the sweet potato and sour cream to the butter mixture.
6. Stir in dry ingredients just until combined. Stir in pecans if being used.
7. Scoop the batter into the loaf pan and smooth out the top.
8. Bake for about 45 minutes, till toothpick inserted in the center comes out clean.
9. Let cool and slice.

Crispy and Chewy No-knead Bread

20140322_140043

I love freshly baked bread. It is one of my favorite things to create in the kitchen, especially in the colder months. The recipes I have tried in the past have all been the kneading type with lots of all-purpose flour. So, when I came across a recipe online at http://www.the-baker-chick.com which in turn referenced another posted at http://www.simplysogood.com, I thought it’s worth the try since it involved very minimal time commitment.

20140321_175336

This recipe is very versatile meaning you can mix in various things. Janet at Simply So Good gives you a whole bunch of options. In my version, I added a heaping tablespoon of harissa sauce. It infused the bread with bit of heat and a touch of caraway flavor in addition to giving it an orangish tint.

20140321_180048

Replacing half the all purpose flour with whole wheat and adding in a bit of ground flax made the bread a bit more wholesome. It is a little denser than the white bread variety (which I would make next just for comparison), but packs a lot of flavor. I brushed a slice lightly with olive oil and toasted in a pan and it was delightfully crispy and chewy. Whether you are looking for a no-knead bread recipe option or something different for a change, this recipe is a definite keeper.

20140321_180354    20140321_181632

One caveat – this dough needs to be proofed for a long period, typically about 12 – 18 hours or so. I proofed mine for about 19 hours and it was great. So, if you are like me, feel free to mix up the dough on impulse and let it do its thing!

20140322_141325   20140322_140043  20140323_123038

Crispy and Chewy No-Knead Bread

  • Servings: potentially could serve just 4 🙂
  • Print

Ingredients
1 1/2 cups whole wheat flour
1 1/4 cups all purpose flour
1/4 cup ground flax
1 1/2 teaspoon salt
1/2 teaspoon yeast
1 teaspoon sugar
1/4 cup warm water
1 heaping tablespoon harissa sauce, optional
1 1/4 cups room temperature water

Preparation
1. Dissolve yeast and sugar in 1/4 cup of warm water and set aside for 5 min till frothy.
2. In a large bowl, combine all flours and salt.
3. Add yeast mixture and remaining water to the flour mixture and mix with a wooden spoon or spatula till a “messy” dough forms. If using harissa or another add-in item, stir it in while adding the water and yeast mixture.
4. Cover with a plastic wrap and keep on the counter top or in a cool oven for 12-18 hours or more till the dough bubbles up and more than doubles.
5. At the end of the proofing time, remove the bowl from the oven and set oven to 450F.
6. After the oven is preheated, place a pizza stone or an oven proof ceramic container in the oven to preheat for 15-20 minutes at least.
7. Invert a large cookie sheet and place a sheet of parchment paper on it. Empty the dough onto the parchment paper and with heavily floured hands gently mold the dough into a dome shape (mine was about 8 inches or so in diameter).
8. Open the oven and quickly slide the parchment sheet with the bread onto the pizza stone. If using a ceramic bowl, slowly invert the dough into the container.
9. CREATING STEAM EFFECT – I used a heavy stainless steel bowl to cover the dough while baking so the moisture from the sticky dough could act as the steam. If you don’t have a similar set up (or if not using a ceramic dish with a lid), you could preheat a broiler pan on the bottom rack of the oven while preheating the pizza stone and add about 2 cups or so of hot water as soon as you slide the dough onto the pizza stone.
10. Bake covered for 30 minutes. Remove cover and continue baking for another 15 minutes or so till the bread sounds hollow when tapped.
11. Carefully remove from pan and loosely cover with a kitchen/bread towel.
12. Serve toasted or untoasted with spreads of your choice or just a dip of olive oil and garlic.

Basic Healthier Pizza Dough

I am constantly on the hunt for good bread dough recipes and I am constantly tweaking them. This pizza crust recipe is one such discovery and fine tuning. This results in a crust that is slightly nutty (due to the soy, flax and wheat) and lends for a crisy, yet chewy crust. All in all, my type of crust! This is especially good for a thin crust pizza or a Chicago-style crust without all the butter and heaviness. I hope you will give it a try and let me know how you liked (or didn’t like) it!

Healthier

Ingredients
1 1/2 cups whole wheat flour
3/4 cup all purpose flour
1/4 cup soy flour
1/4 cup ground flax
1 teaspoon fine sea salt
1 packet active dry yeast
1 teaspoon sugar
1 cup warm water
2 tablespoons olive oil

Preparation1. Dissolve yeast in warm water and stir in sugar. Let stand for 3-5 minutes.
2. Combine all flours, ground flax and salt.
3. Stir in olive oil and pour in the frothy yeast mixture.
4. Knead the dough for at least 5 minutes till a smooth, elastic dough is formed.
5. Oil a large bowl and place the dough in to begin the rising process. Turn the dough over so the oil coated surface is on the top. Cover with a damp kitchen towel and keep in a warm spot for 1 – 2 hours till the dough doubles in volume.
6. After the first rising, punch dough down and shape the crust as desired.

Whole wheat chocolate chip muffin

20140319_181835

Of late, I am trying to have on-hand at least one “to-go” type of food item for those days when everyone at home is running around like a hamster trying to get ready to start the day.  One of my ultimate favorite is Swiss-style muesli (aka overnight oats, chia pudding). Store bought granola bars (and their friends and family) are convenient but they are usually packed with lots of refined sugars and other unnecessary ingredients that are used to extend their shelf-life. So, I have been thinking of alternatives to help us eat a litter healthier.

20140319_173637     20140319_174129     20140319_174927

This is where this recipe fits in. I am not saying these whole wheat muffins are totally healthy at all. They are definitely carb-heavy. Each muffin has about a tablespoon of added sugar (which equates to about 12 grams/48 calories of added sugar in each muffin plus whatever is in the chocolate chips). American Heart Association recommends less than 100 calories from sugar for women and 150 for men. On the other hand, 12 muffins use up only 2 eggs and 1/4 cup of butter, so I guess that may qualify them to be low-fat? 🙂

20140319_180333 20140319_181242

Having said that, I think these are probably better for you than most of the regular muffins that one might get at a grocery store, school/office cafeteria or at a coffee-shop. If you are used to super moist and light muffins, be forewarned that these muffins are on the denser side due to the small amount of added fat and the denseness of whole wheat as compared to all-purpose flour. However, these are quite soft and full of flavor (especially with the hint of orange flavor in them) and I hope you will enjoy them as much as we did.

20140319_183444

Whole wheat chocolate muffin

  • Servings: 12
  • Print

Ingredients
1/4 cup butter
1/4 cup prune puree (homemade or store bought)
2/3 cup sugar
2 large eggs
1 tablespoon grated orange zest
1 teaspoon vanilla
1/2 cup 1% milk
1 1/2 cup whole wheat flour
1/4 cup ground flax
1/4 cup cocoa (I used Dutch processed)
2 teaspoon baking powder
1/2 teaspoon salt
1/2 cup mini chocolate chips

Preparation
1. Preheat oven to 350F.
2. In a large bowl, blend butter, prune puree and sugar until well mixed and light.
3. Add eggs, one at a time, blending well after each addition.
4. Add vanilla and orange zest.
5. Mix all the dry ingredients, except chocolate chips in a medium bowl.
6. Add dry ingredients to wet ingredients alternating with 1% milk.
7. Slowly stir in chocolate chips.
8. Pour batter into a 12-muffin pan lightly sprayed with non-stick cooking spray or lined with paper liners.
9. Bake in the preheated oven for 16-19 minutes and test for doneness.
10. Let cool and transfer to airtight storage container.

Crispy and Healthy Pizza

20140301_191550[1]

I like pizza. I don’t know if I love it, but I certainly enjoy it every now and then. Having said that, anytime someone suggests a carryout pizza, I am usually not keen with the choice. I just don’t feel good about chomping down on a slice of a typical carryout pizza – with a massive crust made with all white flour, tons of cheese (I wonder if it is all 100% dairy based), so-so sauce and a smattering of toppings that you may or may not really care for – leave alone worry about the calories! So, that pretty much leaves me with wanting (and in a peculiar way, longing) to make home-made pizza that not only tastes good but better for you!

20140301_152742[1]              20140301_153049[1]

I like to try out different recipes for the crust, preferring to use a combo of flours. This recipe, to everyone’s delight, turned out to be soooo good – crispy and chewy with a nutty note. I wish I had some whole wheat flour on hand to replace some of the all-purpose flour with (what a crime!). Next time! Anyway, if you are the type that loves this type of crust, forget about the Chicago-style deep dish crust, and give this one a try. I think your body will thank for it as well! 🙂

20140301_185349[1]  20140301_185918[1] 20140301_191133[1]  20140301_191126[1]

Crispy and Healthy Pizza

  • Servings: 6
  • Print

INGREDIENTS

Pizza crust
2 1/4 cups all purpose flour (replace some of the white flour with whole wheat if you would like)
1/2 cup soy flour
1/4 cup ground flax
1 teaspoon fine sea salt
1 packet active dry yeast
1 teaspoon sugar
1 cup warm water
2 tablespoons olive oil
2 tablespoon wheat bran
1 tablespoon olive oil

Pizza toppings
1 cup pizza sauce
1/2 – 2/3 cup part-skim mozzarella (for one pizza)
1/2 -2/3 cup sliced fresh mozzarella (for other pizza)
1/2 cup diced chicken breast
1/2 cup diced green peppers
1 cup broiled or sautéed broccoli florets
1/4 cup finely chopped green onions
2 slices of cooked bacon slices, crumbled

Preparation
1. Mix all purpose flour, soy flour, ground flax, salt, yeast and sugar in a stand mixer or a large bowl (I went with the bowl this time around).
2. Add the olive oil, followed by warm water in a slow stream and mix to form a dough.
3. If the dough is too sticky, add a tablespoon of all-purpose or whole wheat flour. If it is too dry, add a tablespoon of warm water.
4. Knead the dough for 5-10 minutes to make a smooth dough.
5. Coat a large bowl with the additional tablespoon of olive oil. Place the dough ball there and toss to coat with oil.
6. Cover with a damp kitchen towel and leave in a warm, drought-free spot till the dough doubles in size.
7. When ready to prepare the pizza, preheat oven to 500F.
8. Punch down the dough and divide into two parts.
9. Sprinkle a cookie sheet or pizza stone with wheat bran (or cornmeal if you prefer) and flatten one part of dough to a thin crust, about 1/4 inch thick. You can flatten using the tips of your fingers. Repeat with the other part of the dough.
10. Bake the crust for about 7 minutes. Remove from oven.
11. Spread about 1/2 cup of pizza sauce of your preference. Sprinkle with part-skim mozzarella cheese or sliced fresh mozzarella. Follow with toppings of your choice. I used a combination of broiled broccoli, green peppers, baby bella mushrooms, green onions, diced cooked chicken breast and bit of cooked and crumbled center-cut bacon.
12. Bake the pizza till cheese melts and toppings (fresh veggies and pre-cooked meats) are heated through (about 5-7 minutes).

Pineapple Muffins

20140223_184010[1]
This recipe was the result of my attempt to use up a bunch of crushed pineapple I had leftover. I debated between a cake and a muffin. The more I considered the options, the more I was leaning towards a muffin. Ultimately, one has to think of the end users – in this case, primarily my kids.

20140223_180616[1]  20140223_180853[1]

Muffins are a great grab ‘n go breakfast item – especially if they are homemade with some love added to it in the form of healthier ingredients. This was you don’t feel like your kids are eating cupcake for breakfast.

  20140223_183902[1]  20140224_070812[1]

This is a rather simple recipe that could be put together in a jiffy. I actually made these while also preparing dinner.

Pineapple Muffins

  • Servings: 12
  • Print

Ingredients
1 1/2 cups all purpose flour
1/2 cup wheat germ
1 tablespoon ground flax
1/2 teaspoon sea salt
1/2 teaspoon baking soda
1/2 teaspoon baking powder
1 20-oz can crushed pineapple, undrained
2 eggs
1/2 cup minus 2 tablespoons sugar
1 tablespoon oil
1 teaspoon vanilla
1/2 cup fresh or frozen blueberries (if frozen, thaw and drain)
1 tablespoon flour

Preparation
1. Preheat oven to 400F.
2. Combine all dry ingredients from flour till baking powder in a large bowl.
3. Lightly whisk eggs and combine with crushed pineapple, oil, vanilla and sugar in a small bowl.
4. Slowly add wet ingredients to dry ingredients and stir gently to combine.
5. Coat blueberries in a tablespoon of flour so they don’t sink to the bottom of the muffins.
6. Slowly stir in the berries.
7. Scoop the batter and fill a 12-muffin pan almost to full. You can either use a paper liner or spray the pan with non stick spray. I went with latter to get a nice golden color.
8. Bake for about 18-20 minutes till muffin tests done (insert toothpick and see if it comes out clean).
9. Cool in the pan for 10 minutes and remove for storage.

Perfect Waffle

20140223_100523[1]

Everybody loves a good ol’ waffle right? I enjoy waffles as a meal item or as a base for an occasional ice cream sundae! Back in the college days, I remember how my friends and I looked forward to waffle bar Sundays, when there will be a nice little waffle bar set in the cafeteria with all sorts of yummy toppings. Yeah, those days, we would create our own masterpiece of fully loaded waffle that served both as a meal and dessert in one! But that extent of indulgence is far and few in between now a days, but I continue to make different type of waffles about once a week. At this rate, I keep telling myself I need to buy one of those Belgian waffle makers or at least a rotating type of equipment, but so far I am still holding onto my regular old basic machine. (Note to self: Take the plunge and buy a new one already! Yes, along with an ice cream maker!).

This particular recipe uses an unusual ingredient – cornstarch. It somehow helps to decrease the potential sogginess caused by steam during the cooking process and results in a waffle that is pretty toasted and crispy on the outside, yet soft and chewy on the inside. Also, incorporating stiff egg whites into the batter results in a light crispy texture.

20140223_094555[1]   20140223_094740[1]

Personally, I prefer a plain waffle topped with fruits, honey and occasionally a tiny dollop of fresh whipped cream. Sometimes, I do like to make it a bit special with some semi sweet or dark chocolate chips and maybe a sprinkling of chopped nuts. Let your creativity run wild and use whatever topping your little heart desires! I promise you will enjoy every last bite of it!

A quick note about this recipe: Sometimes you hear people say when you use buttermilk/yogurt in a batter, you typically will have to use baking soda instead of baking powder. I used the latter in this recipe and it worked great!

20140223_101525[1]

Perfect Waffle

  • Servings: 4
  • Print

Ingredients
1 1/2 cups enriched all purpose flour
1/4 cup corn starch
1 tablespoon baking powder
2 tablespoons sugar
1/4 teaspoon salt
2 eggs, separated
1 cup fat free plain yogurt
1/2 cup 1% milk
1 teaspoon hazelnut extract (or vanilla)
1/4 cup oil
Cooking spray

Preparation
1. Measure out the dry ingredients and mix well in a medium bowl.
2. Combine egg yolks, yogurt, milk, extract and oil in another bowl and set aside.
3. In a small bowl, whish egg whites till stiff peaks form.
4. Add wet ingredients to dry ingredients and mix gently with a spatula or whisk.
5. Now, slowly incorporate the beaten egg whites in two batches, taking care not to overwork the batter. You want to retain as much of the air as possible.
6. Follow your waffle maker directions and make your waffles.
7. Serve right away with your favorite toppings.