Air Fryer Chicken Thighs and Sweet Potato

20181112_193850

I know instant pots are all the rage now. I have heard of people who own these in various sizes! Not me…at least not yet. I haven’t jumped on that bandwagon yet – and even if/when I do, I am quite confident I will not be owning more than one. So, for now, I do own an air fryer (have been for maybe a year now).

You may wonder what I have used it for. In all honesty, my husband has used it more often than I have – and definitely it is not to make anything meal worthy! He has only ever made frozen fries in them. They taste great, but I figured there should be other applications of the gadget than just for crisping up frozen food. So, I started experimenting, first with vegetables seasoned with salt and ever so slightly drizzled with oil. My favorite…eggplant slices and broccoli! Yum! Then, I got to thinking…and googling.

20181112_185717

Damn! You can even make desserts in an air fryer! Wow! Anyway, I wanted to attempt a main dish, and hence was born this chicken and sweet potato recipe.

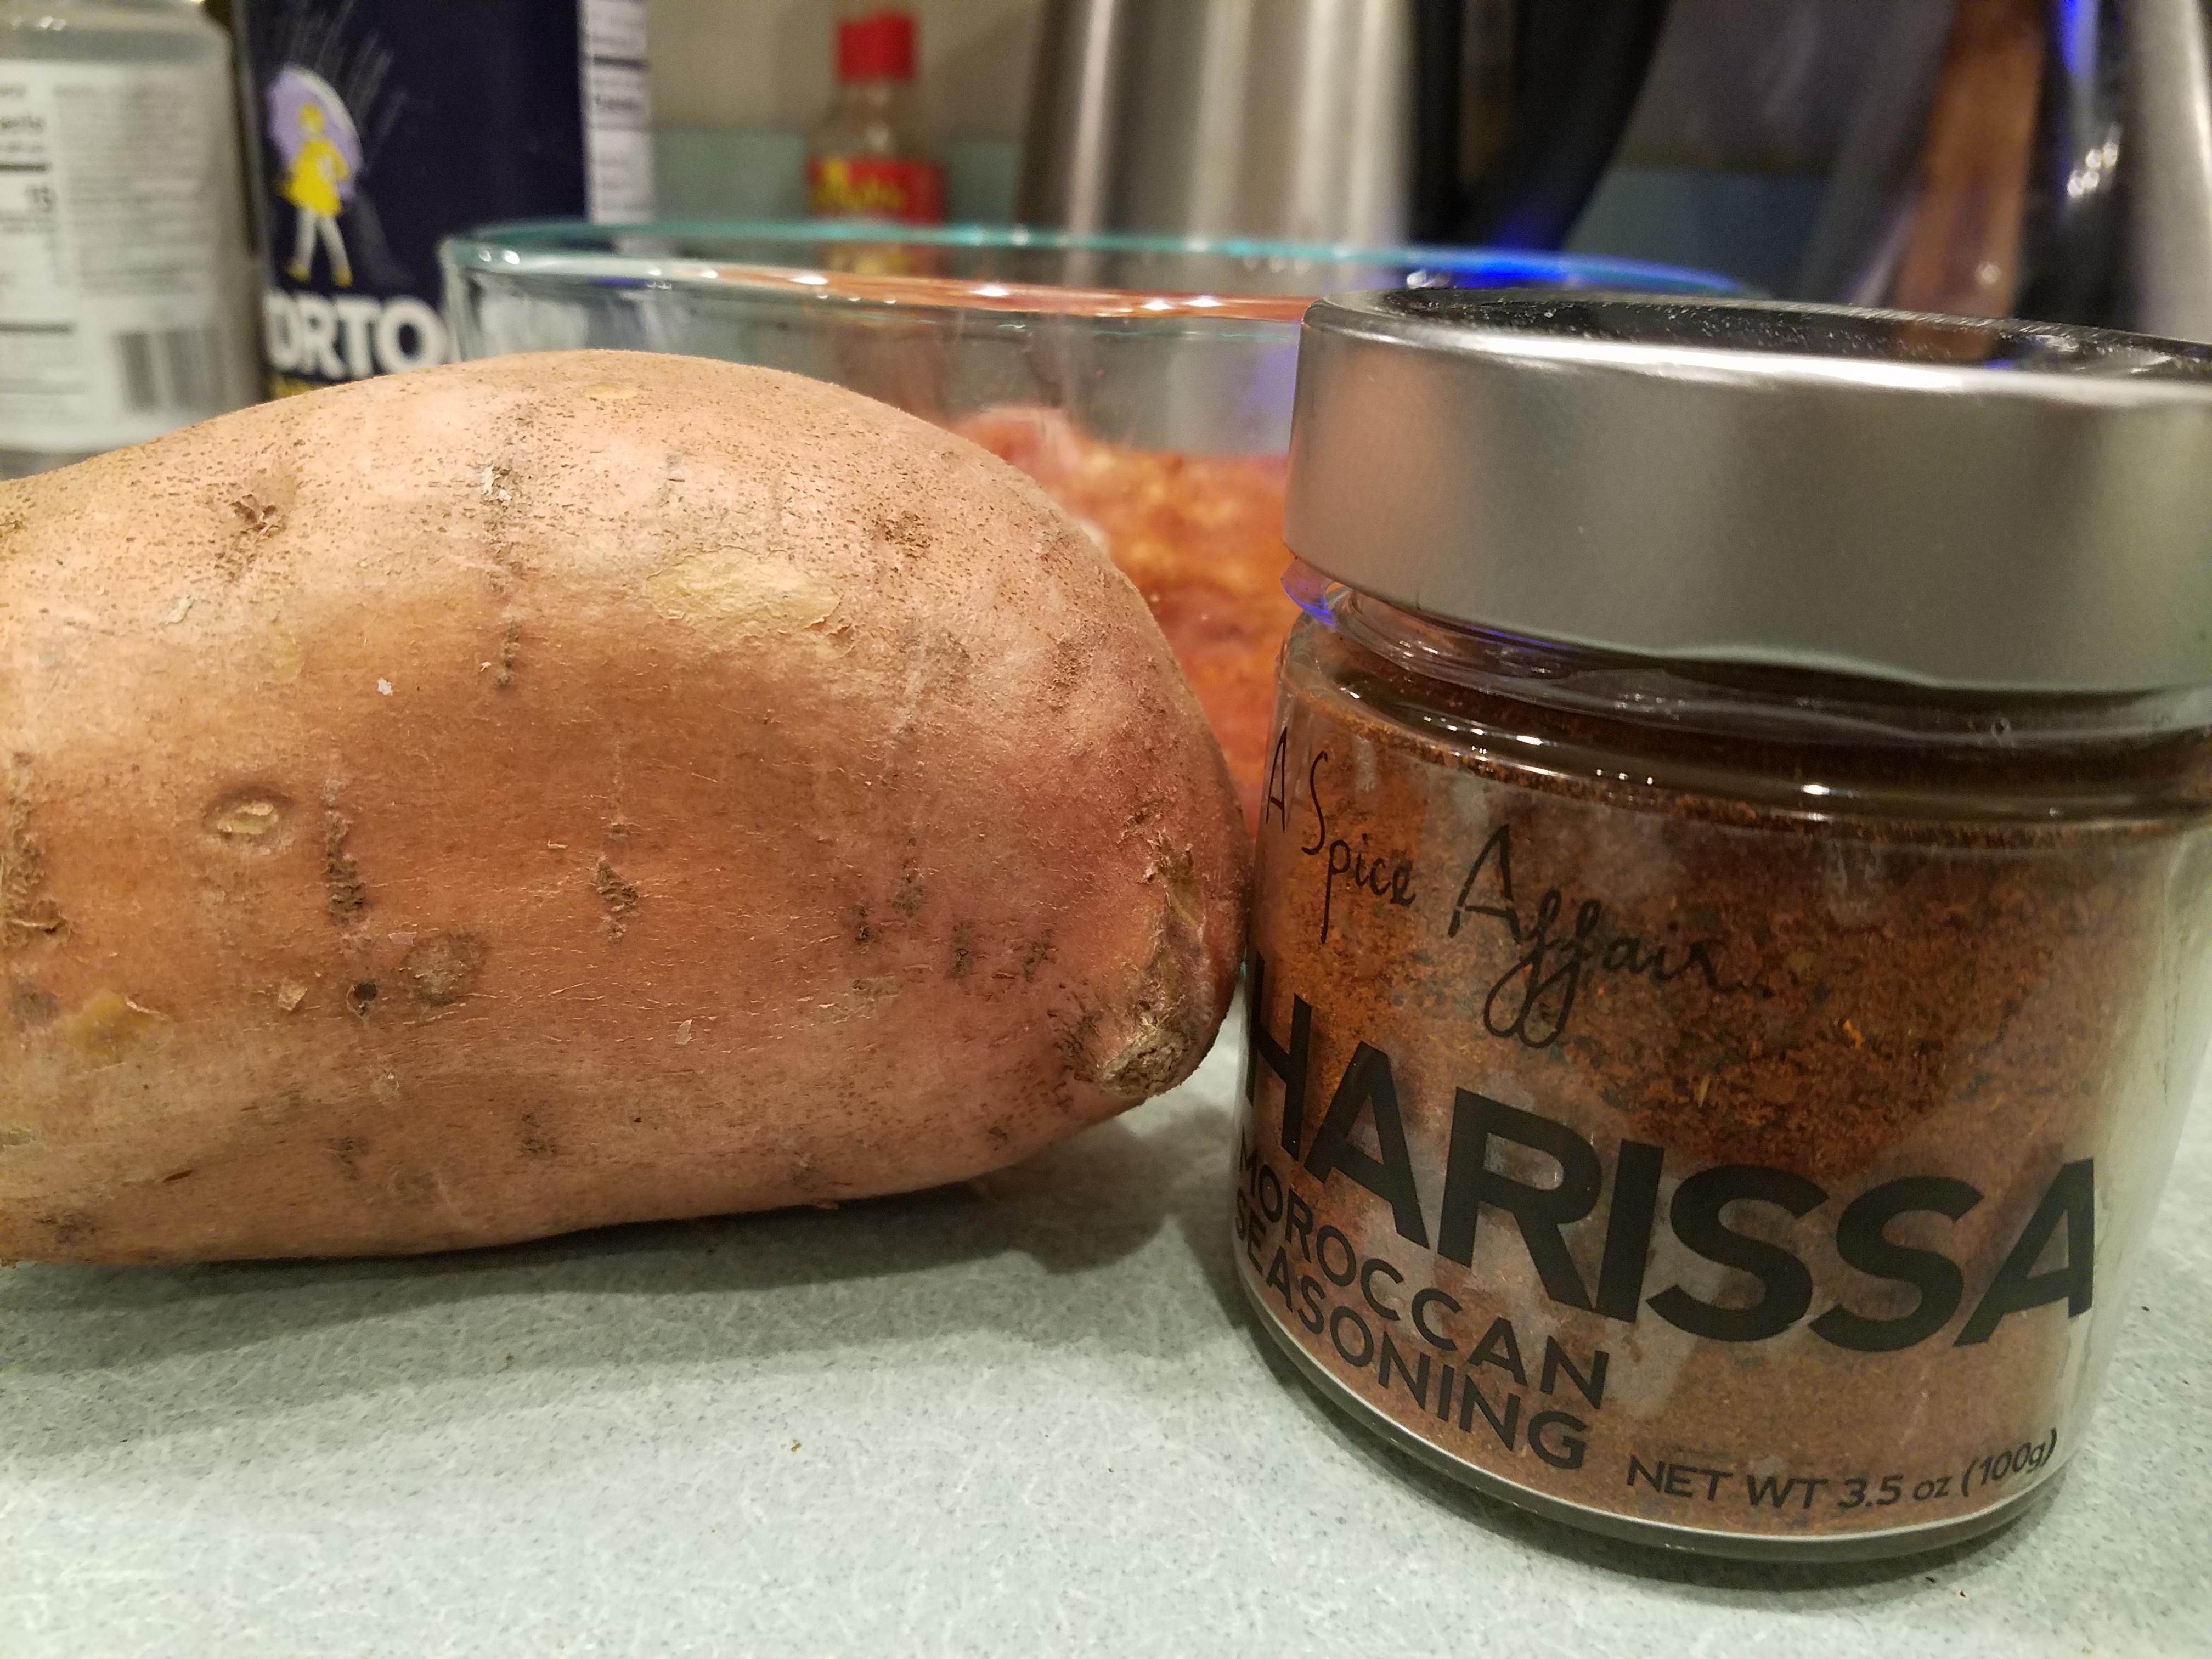
Honestly, you can use any seasoning for the chicken thighs (or drumstick or cut up breast). I happened to stumble upon harissa seasoning at a local TJMaxx (love the store for the interesting finds) and decided to try it. Harissa seasoning has complex spice notes with good amount of heat, so use it according to your taste. I needed to add salt because the bottle I bought did not have any.

After about 30+ minutes in the air fryer, the chicken thighs were super crispy on the outside (thanks to the skin) and juicy and delicious inside. Sweet potato took on a nice flavor from the chicken as well. The best compliment was “Hon, I am sorry, I don’t think I can eat the bone!” So, if you own an airfryer, you have to try this recipe. If not, either buy one or try the recipe in a 450F oven.

20181112_193858

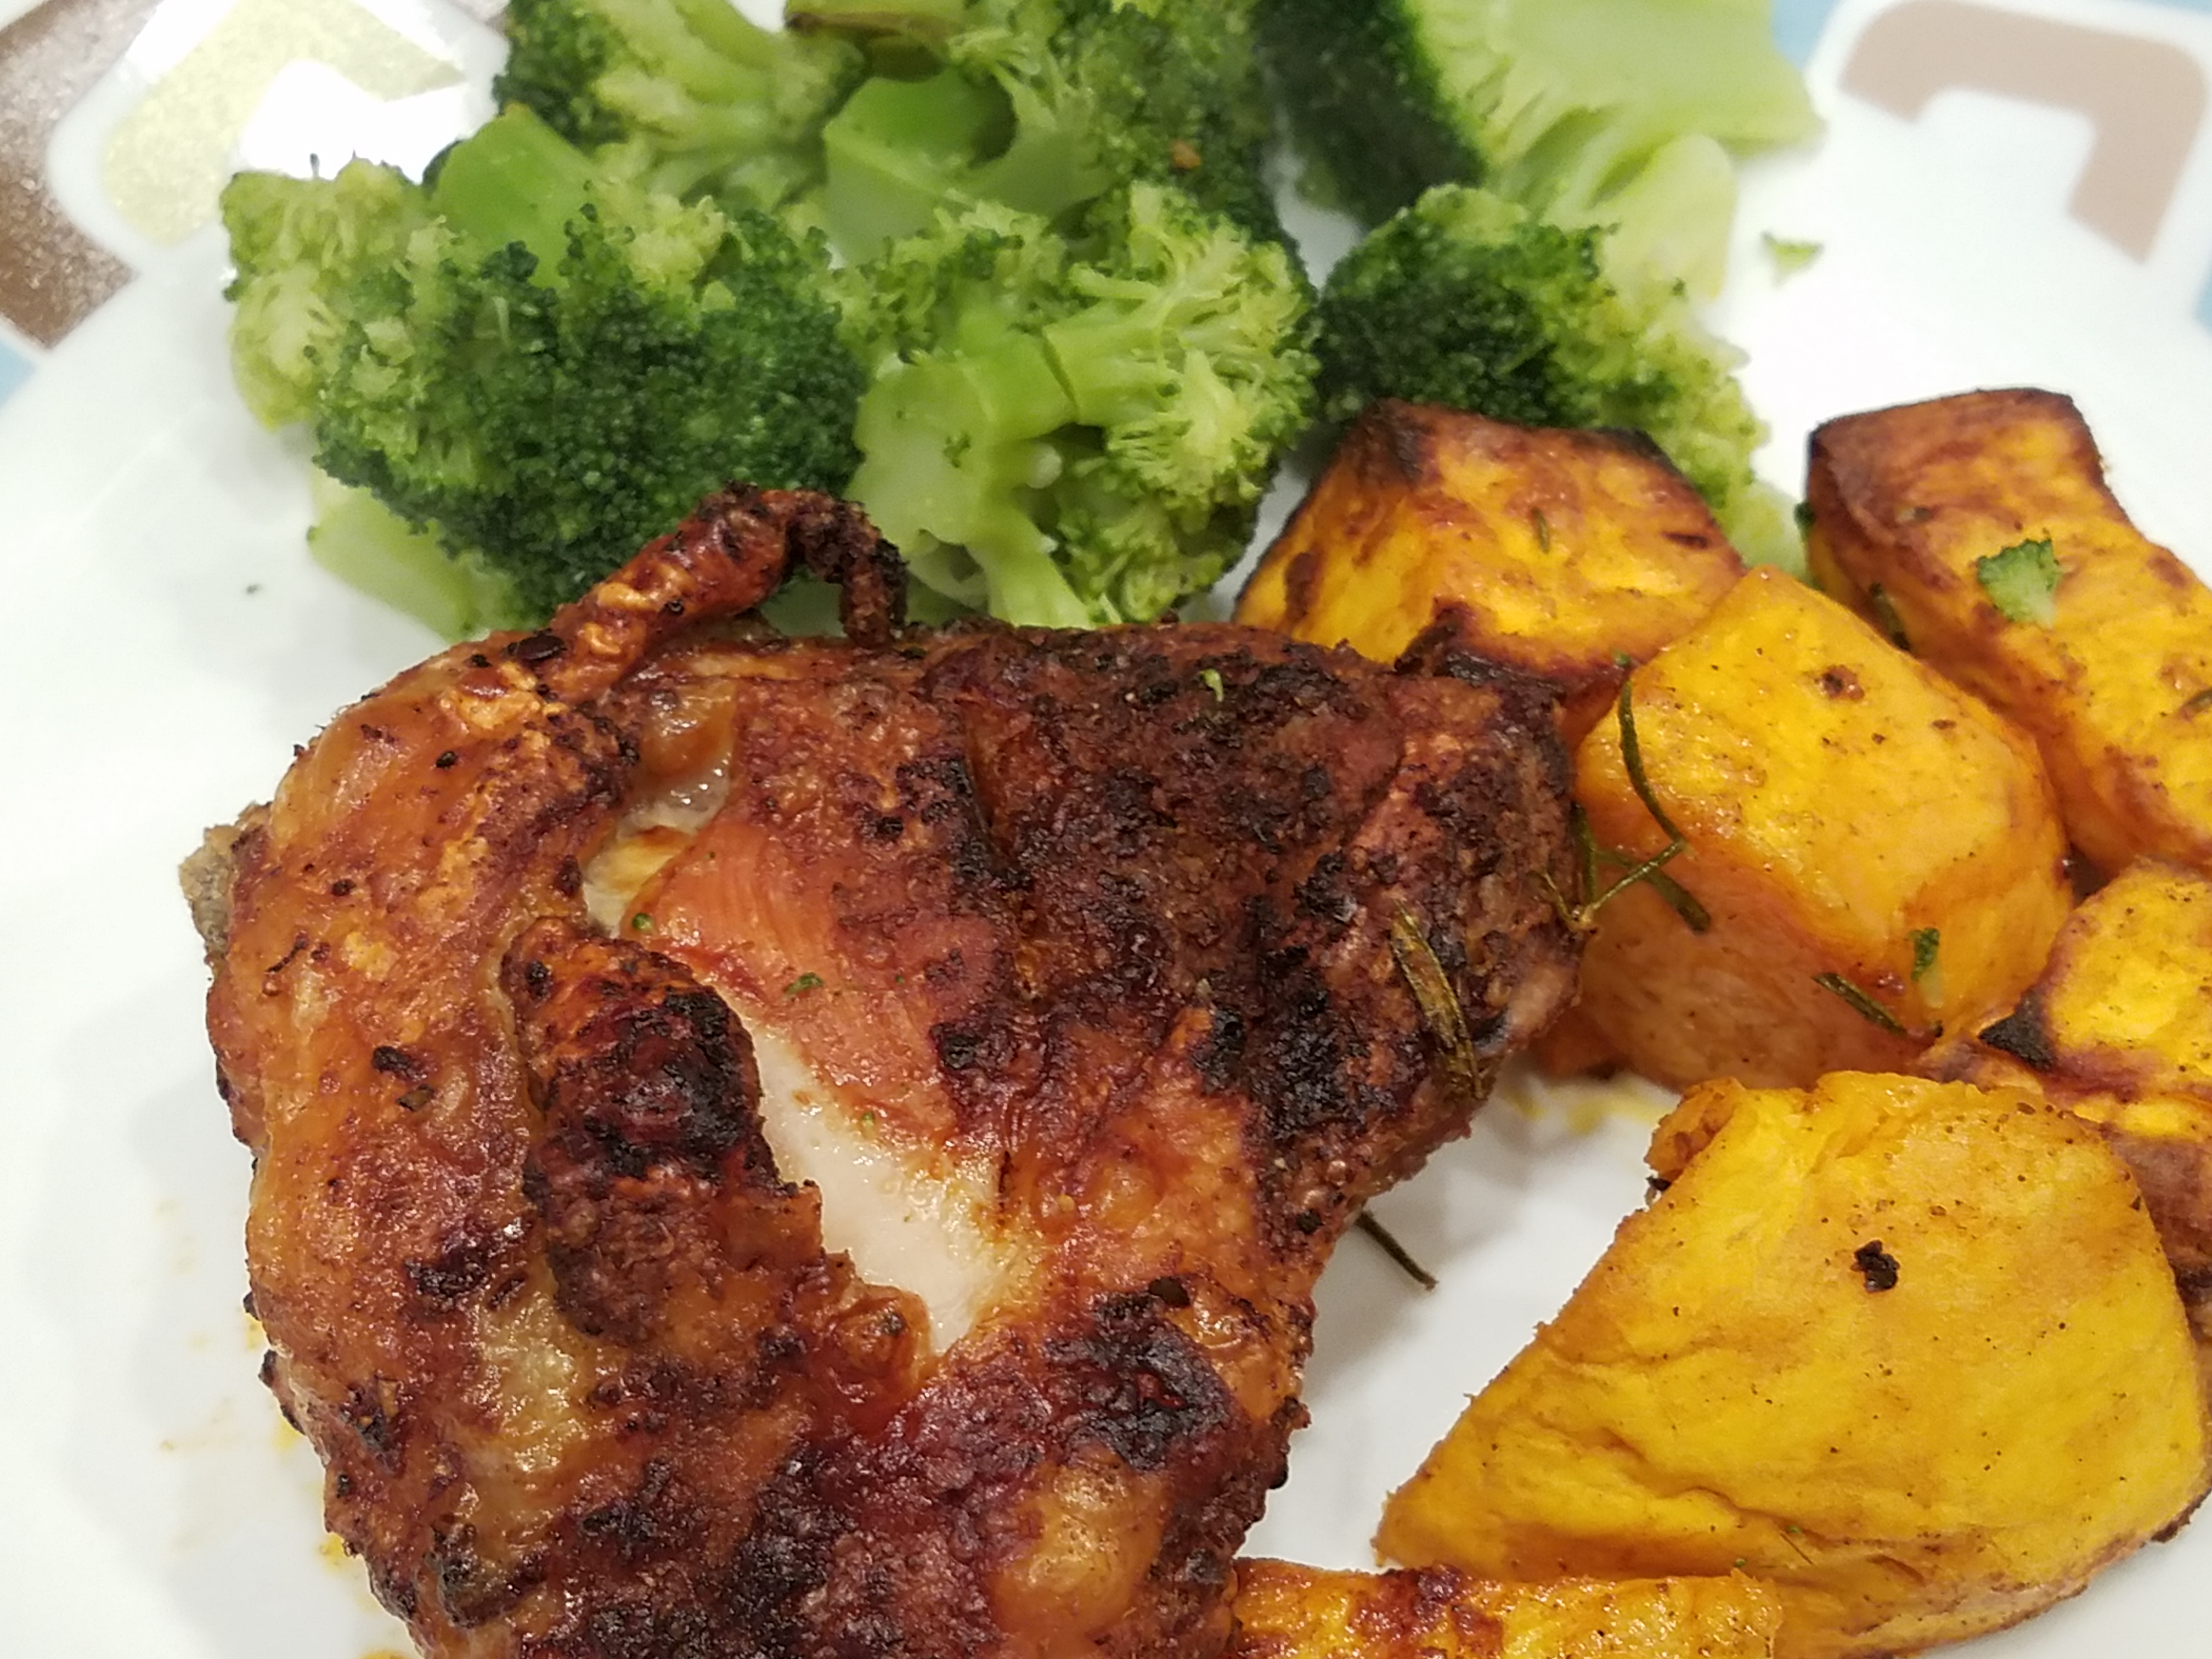
Air Fryer Chicken Thighs with Sweet Potato

  • Servings: 4
  • Print

Ingredients:

4 chicken thighs, excess fat trimmed, but with skin

1 tablespoon plus 1 teaspoon harissa seasoning

1 teaspoon salt, divided

2 medium sweet potato (or regular potato)

2 tablespoons oil, divided

Preparation:

  1. Preheat the air fryer to 375F.
  2. Score the skin side of the chicken thighs deeply with a sharp knife. Season with a blend of 1 tablespoon harissa and 1/2 teaspoon salt (or more to taste). Make sure seasoning gets into the cut slashes. Drizzle both sides with a tablespoon of oil.
  3. Place chicken thighs, skin side down in the air fryer and cook for 10 minutes.
  4. While the chicken is cooking, peel and cut the sweet potato into large chunks, about 1″ wide. Toss with remaining salt, harissa and oil.
  5. Remove the chicken thighs from the fryer and set aside on a plate.
  6. Add the sweet potato to the air fryer and top with the chicken, this time with skin side up.
  7. Cook for another 25 minutes or more till the chicken and sweet potato are cooked through and the top of the chicken is browned and crispy.
  8. Transfer to serving plates and serve with other sides or vegetables for a wholesome, delicious dinner.

Penne with Chicken and Red Peppers in Light Cream Sauce

20161106_0935501

Where did the last whole year go??! I simply can’t believe it’s been over a year since my last post back in November 2015! Thank you for those of you that continued to pop in to refer to my old recipes! I have no sound reason or excuse for not posting here over the past year. I thought about it almost every other day, felt guilty, but didn’t quite take the time to translate that to action. But, here I am today, with a renewed enthusiasm to post again – and what better way to kickoff the new season (both the Fall season and my season 2 of blogging) than share with you a simple recipe for a comforting dish of pasta with chicken and red peppers in a light cream sauce!

This dish really does together in a snap! All you need is some cut-up boneless/skinless chicken (thighs or breast), red peppers, some light cream, pasta and basic seasonings such as Italian herb mix and garlic. You can work on the chicken and red pepper sauce while the pasta cooks, so you can just toss the pasta into the sauce as soon as it is done! What is even more appealing about this recipe, since it is super quick to make, this could easily be a weeknight dinner recipe!

So, grab the few ingredients listed below and start whipping up a comforting bowl of pasta for tonight! And, oh, if you so desire, stir in some cut up spicy chicken Andouille sausage with the chicken for an extra special treat!

20161106_1753451

Penne with Chicken and Red Peppers in Light Cream Sauce

  • Servings: 8
  • Print

Ingredients:
1 16-oz pkg of penne pasta (I used vegetable kind)
1/4 cup chopped onion
2 tablespoons finely chopped garlic
2 tablespoons olive oil
1 large red bell pepper, cut up into bite size pieces
1 1/2 pounds boneless/skinless chicken, cut up into bite size pieces
1 cup canned fire-roasted diced tomato
1/4 grated Parmesan cheese
1/4 cup light cream
Crushed red pepper, Salt and Pepper to taste
Extra cheese, if desired

Preparation:
1. Bring a large pot of water to boil and cook pasta according to directions.
2. While the pasta is cooking, heat the olive oil in a large skillet over medium high heat. Saute onion and garlic for a minute and add the red peppers. Stir often and cook until the peppers are a bit charred.
3. Add chicken to the pan and continue to saute till it cooked through.
4. Slowly add the tomato to the pan and season with salt, black pepper and salt to taste. Continue to cook for another 3 minutes.
5. Mix in the grated cheese and light cream. Reduce heat and simmer till everything melds together (about 3 minutes).
6. Turn off heat and toss in the cooked, drained pasta. Serve immediately.

Tip: Leftover pasta can be transferred to an airtight container and kept in the refrigerator for another meal mid-week.

Easy Basil Fried Rice

20150822_130033

I love food! I guess that’s quite obvious by now! But seriously, I do enjoy a variety of cuisine – sambols and rotis from my homeland, Sri Lanka, pasta dishes characteristic of Italy, slow rendered duck breast and macarons from France, tacos and fajitas from south of the border, curries and rice dishes from India, Pakistan, China, Thailand….And the list goes on!

20150822_120328

Each cuisine is unique and unparalleled with incredible flavor combinations, textures, colors and taste! I have a bit of a special fondness for Thai dishes – perhaps it’s the coconut milk and ample use of green chili. So, I had this craving for a yummy Thai fried rice, but without having to go for takeout.

20150822_122203

I was pretty sure I had the basic ingredients handy – basil, fish sauce, palm sugar, rice, eggs and a medley of vegetables. A quick look through the refrigerator and pantry confirmed my hunch! So, after perusing through a few recipes for inspiration, I decided to use my own pseudo blend of Thai seasonings! I figured even it didn’t taste Thai at all, it will still be pretty darn good. And good it was! In fact, it was probably better than good. My family loved it and both my kids (one who hates fish sauce and the other who has a pretty discerning taste for fried rice) actually verbally acknowledged that the rice was good. That, in my books, is a pretty big win!

20150822_122415  20150822_123131

This rice is especially good, made with a day old rice kept in the refrigerator. If you are like me and have a freshly cooked batch, just spread 2 cups of the cooked rice on a plate and chill till you prepare the ingredients. It worked fine. I think day-old rice just helps to keep the kernels separate – like in restaurants.

20150822_125958

Easy Basil Fried Rice

  • Servings: 4
  • Print

Ingredients
2 cups cooked rice, preferably a day old kept overnight in the refrigerator
2 tablespoons canola oil
2 cups of chopped vegetables of your choice (I used carrots, onions, savoy cabbage and celery)
2 eggs
1/4 cup roughly chopped basil leaves

Seasoning:
1 tablespoon fish sauce
1 tablespoon soy sauce
1 tablespoon minced ginger
2 large cloves of garlic, minced
2 tablespoons ketchup (I used tomato sauce)
1 tablespoon sugar (I used palm sugar)
1 tablespoon rice vinegar
Sprinkling of crushed red peppers, optional

Preparation
1. In a small bowl, combine all the seasoning ingredients. Set aside.
2. Heat a large saute pan or wok over high heat. Add the oil and saute the vegetables for 3-5 minutes.
3. Add the rice and seasoning mix. Toss to mix thoroughly. Spread the rice and vegetables across the pan to allow them “fry” a bit more” – another 3 minutes or so.
4. Push the rice and vegetables to the edge of the pan, creating a well in the center for the eggs.
5. Lightly beat the eggs and pour in the center of the pan. Let set and scramble. Mix the egg with the rice and vegetables.
6. Remove from heat and serve with meat or vegetable stir fry and/or an Asian cucumber salad.

Braided Chicken and Spinach Bread

20150110_204825

For all the sighs and groans I hear about working with yeast, I must say, they are not that difficult to work with – that is, provided you have unexpired yeast that you know to keep alive!

20150110_192606  20150110_184812

You think that sounds a bit gory – like some man eating zombie or something! May be I feel that way because I forced myself to watch the much anticipated (not by me by any means) return of The Walking Dead last night! Eeewww…to stupid and….stupid if you ask me! After enjoying Will Smith’s “I am a Legend”, I am content with not watching any more zombie nonsense!

20150110_192830

Anyway, back to yeast! Yes, so if you have braved to make a simple pizza dough, you have passed the threshold into the vast untapped potential of bread making! If you are still contemplating your first encounter with these little eukaryotes, then, fear not…just grab yourself a refrigerated pizza or bread dough from the store! Yes, yes, there is always a place for Pillsbury’s in everyone’s kitchen!

20150110_201147

This recipe is pretty simple and straightforward. Make a savory filling of your choice (let your imagination run wild), roll out the dough, place the filling, score opposite ends of the dough (they will look like a millipede or something similar with a gazillion legs), braid, brush with egg wash and bake! Trust me…it’s a fun art project like endeavor. Once you bake these, you will want to make more! They keep well in the refrigerator for a few days and make a great lunch (make them into single-serving sizes) to pack – for kids, for your spouse, for YOU! If you make them small enough, they also make a great snack for a road trip – depending on your filling and your own taste buds, they taste fine at room temperature as well.

20150110_202511  20150110_204806

So, I hope you won’t skim this recipe and take a pass! Give it a try and I am pretty sure this will become a keeper!

20150110_204835

Braided Chicken and Spinach Bread

  • Servings: 4
  • Print

Ingredients
1 container refrigerated pizza or bread dough (like Pillsbury’s)
OR
1 recipe (equivalent of 1 loaf of bread or 1 12-16″ pizza) of your choice
3/4 lb boneless, skinless chicken* (thighs or breast), seasoned with salt and pepper
1 8oz package frozen, chopped spinach, thawed and excess liquid squeezed out
2 tablespoons olive oil
2 cloves of garlic, finely minced
1/4 cup finely chopped onion
1/2 teaspoon ground cumin
1/2 teaspoon paprika
salt and pepper to taste
1/2 cup grated mozzarella or cheddar, optional

Preparation:
1. Preheat oven to 400F.
2. Heat 1 tablespoon of olive oil in a non-stick skillet over medium high heat. Cook the chicken breast or thighs on each side till golden brown, lower heat to medium and continue cooking for another 5-7 minutes on each side till the chicken is cooked through and all juices run clear. You may need to adjust the cooking time depending on the thickness of the meat.
3. Remove cooked chicken to a platter and let rest. Once the chicken is cool, shred the meat or dice into tiny cubes.
4. Return the pan to heat and add the remaining tablespoon of oil. Saute onion and garlic till fragrant (about 2-3 minutes). Add the ground cumin and paprika, stir to mix. Now, stir in the spinach.
5. Cook the spinach mixture till any remaining liquid evaporates. Add in the shredded chicken and heat through to blend in all the flavors.
6. Let the chicken-spinach mixture cool down to room temperature.
7. Divide the dough into 4 equal portions and roll out into a 1/4 inch thick rectangle.
8. Place 1/4th of the filling along the center of the dough, lengthwise, leaving about 2-3 inches on each long side.
9. Using a sharp knife, cut 1/2 inch strips along each side of the filling like shown in the picture. Criss-cross the strips like braiding and tuck in the ends. Brush with the egg wash.
10. Place all the braids on a parchment lined sheet pan and bake for 18-20 minutes till the tops are golden brown and the dough is cooked through.

You can serve this immediately with a dipping sauce of your choice or refrigerate for later enjoyment!

* Instead of cooking the chicken, you can certainly substitute leftover grilled or poached chicken. Just skip steps 2 and 3!

Comfort Pasta with Kale and Ground Beef

20150126_114856

What is it with pasta and the gazillion ways in which you can prepare them! They truly are a star pantry item!

I know I said I am going to try to get back on my healthy wagon, so I think you will appreciate this recipe. Yes, yes, it’s almost the end of January when most of the resolutions fall to the wayside. But, after trying this recipe, eating healthy may not be that difficult after all.

20150126_122005

This recipe is pretty simple, something I concocted while recovering from a mini version of the flu (thankfully short-lived due to Tamiflu). I didn’t quite have the energy to spend an hour in the kitchen, but at the same time didn’t want to be bed sofa-ridden for another meal. So, there I lay making a mental rundown on the items I had on hand, especially the pound of extra lean beef I was going to make chili with before I fell sick.

20150126_122422

So, now that the chili making was off the table till next weekend, I figured I should use up the beef in some form rather than freezing it. Pasta dish it will be! Kale, carrots, mushrooms, beef and a touch of cream and garlic! Simple, yet comforting enough!

20150126_130434

What are you waiting for? Grab the handful of ingredients this recipe calls for and whip up this dish while the pasta cooks! Yes, it is that simple! Go ahead and try it, you might actually end up planning to make it again soon!

20150126_130444

  • Servings: ”4″
  • Print

Ingredients
1/2 package pasta of your choice (I used penne)
1 tablespoon olive oil
2 large cloves of garlic, minced
1/4 cup finely chopped onion
1/2 pound lean (or extra-lean) ground beef
1 small bunch kale, rinsed and broken into small pieces
1 large carrot, peeled and cut into small cubes
2 cups of slices mushrooms
1 teaspoon Italian seasoning
dash of ground black pepper
Salt to taste
1/4 teaspoon freshly grated nutmeg
2 tablespoons of cream
1/4 cup grated parmesan
crushed red pepper, optional

Preparation
1. Bring a large pot of water to boil. Season with salt and cook pasta per directions.
2. In a large pot, heat a tablespoon of olive oil. Saute garlic and onion till translucent.
3. Add ground beef and brown the meat, breaking up any large clumps.
4. Add the carrots and continue cooking for another 5 minutes.
5. Now, add the kale and mushrooms and saute for another 3-5 minutes.
6. Season with Italian seasoning, black pepper and salt per your taste.
7. Add the cream and grate the nutmeg.
8. Toss with pasta and serve with a sprinkling of parmesan and crushed red pepper, if desired.

Easy Summer Berry Preserve

20140622_205233

Warm weather is here and that means strawberries! Bright, red, juicy berries so full of flavor and nutrition that you can enjoy in many ways! That brings me to canning!

I have long admired the talent, passion and patience of folks who make it their summer mission to not only source season’s freshest produce, but also take the time to prepare and preserve them for months to come! When we visited our friends last winter, we had the opportunity to sample some homemade jams and preserves! They tasted so pure and delicious! Best of all, they were free of commercial preservatives and had significantly less added sugar. My friend insisted it was so simple to make! OK!

Since then, I sort of dabbled with the thought of trying my hands at making some homemade jam myself but kept putting it off! So, when the strawberry season came around, I just had to take the plunge! So, we went to the local farm to pick some berries. Ahh….what an enjoyable experience! From toddlers to grandparents, it was an afternoon of fun for everyone!

20140621_173134

After a bit of crawling around on piles of hay and red fingers, I managed to keep the family working long enough to pile on about 10 lbs of berries! That was the easy part! Seriously! The hardest part is setting aside the time to sort through, rinse, hull, blot and prepare the fruits!

20140621_170213

Since this is the first time making preserves, I wanted to make just enough to fill a few 16-oz jars!

After seeing how much added sugar is in a traditional homemade or store bought jam/preserve, I wanted to control the amount of sugar in my recipe. I heard from a fellow shopper in the pectin aisle that stevia has a weird taste and flavor and she uses raw turbinado sugar to reduce the amount of added sugar. After a bit of contemplation and a quick Google session, I decided to try a combination of few sweeteners – raw turbinado, stevia and regular refined sugar! So, after grabbing a small jar of pectin (for low/no sugar recipes), a large bag of stevia (swallow) and a pouch of turbinado, I raced to get a few canning jars! Armed with a dozen Canning jars, I started to feel like a pro!

20140622_202822         20140622_202853

Once you clean and prepare the fruits (or if you are lucky, recruit family and friends to do it for you!), rest of the process is very quick and easy.

After a few minutes of cooking, you are ready to scoop into sterilized jars and seal for later! See, I told you the cooking process is easy!

20140622_203526

NOTE ABOUT TASTE/TEXTURE: After opening many a jar of store-bought jelly and preserves, the look of this preserve closely resembles other low-sugar versions you get at the store. It’s not as “glossy” looking as regular sugar versions, but I didn’t mind it much. It tastes great and most importantly it was a winner with my kids!

20140622_205246

This recipe is a winner even for the most challenged cook! So, give this a try and see for yourself! You still have a few days left of the strawberry season in your local area, so make it a berry fun weekend!

Easy Summer Berry Preserve

  • Servings: 3 16-oz jars
  • Print

Ingredients
4 cups of crushed fresh berries
1/2 cup refined sugar
1/2 cup raw turbinado sugar
1/2 cup stevia
3/4 cup water or strawberry juice
6 tablespoons fruit pectin for low/no sugar recipe
1 teaspoon butter, optional
3 16-oz canning jars with lids

Preparation
1. Wash the canning jars and the two-part lids with dish soap and warm water. Bring a large, wide pan of water to a low simmer and place the jars and the lids. Keep them in the water till the preserve is ready to be poured in.
2. Scoop the crushed berries, sugars and water into a large, heavy bottom pan and place over medium heat.
3. Add the pectin, while continuously stirring so as not to allow the pectin to clump up.
4. Stir in the butter. Increase the heat to medium high and bring the mixture to a rolling boil.
5. Continue to maintain the boil for 2-3 minutes and turn off heat.
6. Using tongs, carefully remove one jar at a time and spoon (or funnel) in the hot preserves, leaving about 1/4″ – 1/2″ space at the top. Using tongs, remove the flat lid from the water and place on the jar. Wipe away any spills from the rim and sides and seal using the lid rings. Repeat with remaining preserves.
7. Place the filled jars into a water bath with boiling water for 10 minutes. Turn off heat, wipe down the jars and place in the refrigerator.
8. Check for seal after about 24 hours. Lid should not have any bounce when you press on top. Your bottled preserves are ready for storage or giving away as gifts.

Creamy and Spicy Southwestern Chicken Chili

20140609_190218
If you have read this blog before, you know I love chili! I make it with beef, ground turkey or chunks of chicken – each one with its unique taste of the moment! This particular chicken chili is made using leftover barbequed chicken rubbed with chipotle chili seasoning and garlic and I must say it was pretty darn good. Now that the warm weather is here to stay at least for the next few months, I thought this could be a recipe to use up your leftover chicken from your backyard barbeque.

20140609_183032

This recipe really doesn’t take long to put together at all and it takes very few ingredients, especially because the chicken was well seasoned. If you don’t have spiced leftover chicken, you can substitute any grilled chicken (as long it was not basted in bbq sauce) and add a bit of southwestern or chipotle seasoning.

20140609_183101

I added beans and some veggies to make this more wholesome. Feel free to toss in diced sweet bell peppers, carrots, celery etc. along with your favorite beans to make this filling and nutritious.

20140609_185748

Stirring in some sour cream towards the end of the cooking makes this dish creamy and a bit tangy which adds to the complexity of the taste. I hope you give this a try!

20140609_190407

Creamy and Spicy Southwestern-Style Chicken Chili

  • Servings: 4
  • Print

Ingredients
2 cups diced/shredded leftover cooked spiced chicken
1 cup diced celery
1/2 cup diced carrots
1/2 cup diced sweet peppers
1 cup thinly sliced kale, stems removed
1/4 cup finely chopped onions
1/2 jalapeno, finely chopped (optional)
2 cloves garlic, finely minced
2 tablespoons olive oil
1/4 cup light sour cream
1 8oz can tomato sauce
1 can kidney beans, drained and rinsed well
Additional chipotle pepper rub or other southwestern seasoning to taste (optional)
1/4 cup chopped cilantro

Optional toppings
Grated Mexican blend cheese
Diced avocado
Crushed tortilla chips
Sour cream

Preparation
1. Heat olive oil in a medium pot. Add onion and garlic and cook for 2-3 minutes.
2. Add celery, kale, carrot and peppers and continue cooking for 5 minutes.
3. Add the chicken, additional seasoning if desired, beans and tomato sauce and simmer for 10-15 minutes over medium heat.
4. Adjust seasoning and remove from heat.
5. Serve immediately with your favorite toppings.

(See, I told you it is an easy recipe!)