Spicy Cauliflower Burger

Do you love a good burger? How about a veggie burger?

20170110_190327

If you are like me, you would have answered in the affirmative to both those questions. How I wish I could eat burger (the meat version) and fries most days of the summer – straight from the grill onto my plate and into my tummy. In those instances, I try hard to remind myself I am not a teenager who can burn off those calories in a jiffy. So, I don’t indulge them in all that often.

20170110_180010

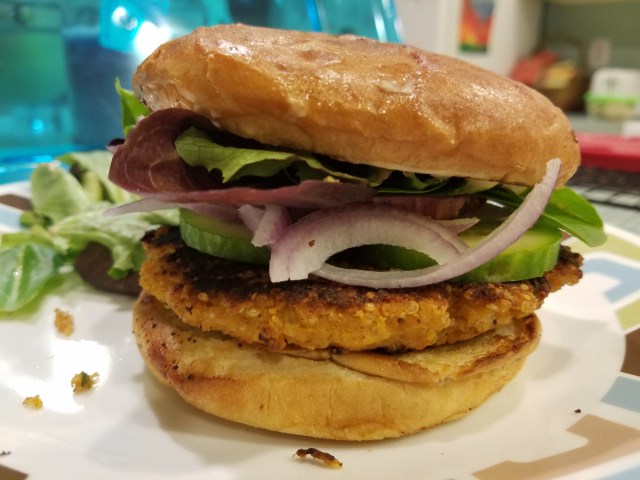
As a near distant substitute, I resort to veggie burgers every once in a while. It’s usually those frozen kinds. While at least one brand has come to be an OK substitute, I never get the satisfaction of biting into a real burger. At least not until I tried this homemade version for a spicy cauliflower burger.

20170110_180519

This recipe is not my original. It was inspired by Pinch of Yum. While I tweaked my recipe a little, much of the meat (no pun intended) is derived from the original recipe.

20170110_181003

Spicy Cauliflower-Quinoa Burger

  • Servings: 10
  • Print

Ingredients
3/4 cup uncooked quinoa
1 head cauliflower, separated into florets
4 tablespoons oil, divided
1/2 teaspoon cumin seeds, crushed (or 1/2 teaspoon cumin powder)
1/4 – 1/2 teaspoon cayenne powder (adjust to taste)
1 tablespoon minced garlic
1/2 cup ground almonds (almond meal)
3 tablespoons cornmeal
1/2 – 3/4 cup shredded Pepperjack or mild cheddar cheese
3 eggs
1 1/2 teaspoon salt
Burger buns of your choice

Toppings
Finely shredded purple cabbage, sprinkled with lime juice and a dash or salt
Thinly sliced red onions
Avocado slices
Chipotle mayo
Other toppings of your choice

Preparation
1) Preheat the oven to 400 degrees.
2) Cook quinoa according to package instructions, but use only 1 cup of water or vegetable broth. Turn off heat, fluff the quinoa and let cool.
3) Layer the cauliflower florets in a single layer on a foil-lined baking sheet. Drizzle with 1 tablespoon oil and sprinkle with spices. Roast for 20-30 minutes. Let cool.
4) Using a food processor, pulse the roasted florets to break into small pieces that look like grated cauliflower. Take care to avoid grinding to paste.
5) In a large bowl, combine pulsed cauliflower, cooked quinoa, garlic, almond meal, eggs, salt, cornmeal and cheese. If you like your food really spicy, you can add additional cayenne or black pepper.
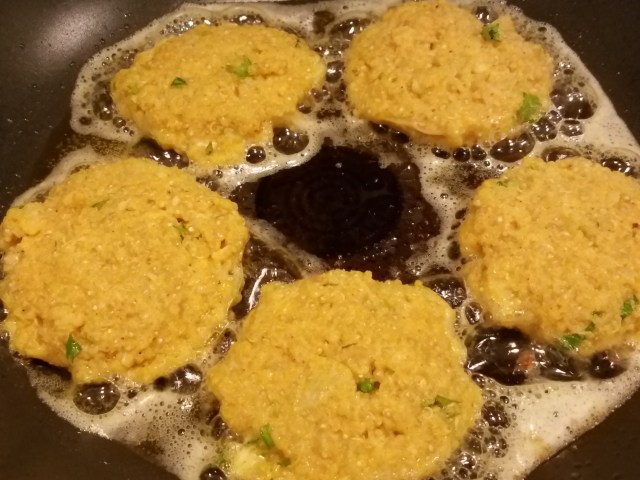
6) Form into patties. According to the original recipe, this should make about 10 burgers, but if you are like me, you will probably make fewer, thicker patties. It’s your choice. But, if you do make it thicker, add additional cooking time.
7) Heat a large nonstick pan over medium heat. Add a tablespoon of oil and cook a batch of burgers on one side until golden brown. This may take about 4 minutes or so. Flip carefully to maintain shape and cook on the other side for another 3-4 minutes.
8) While the original recipe asks to transfer the burgers to a paper lined plate, I kept mine on a wire rack placed on a cookie sheet and kept in the warm oven to maintain the crispy texture and keep the burgers warm.
9) Assemble the burgers per your taste and be amazed at how incredibly satisfying it is.

NOTE: These burgers freeze well. Reheat in the oven or over the stovetop.

Spicy and Tangy Tofu Stir Fry

Hello friends!

I failed yet again at my promise to self to keep up with the blog. Too many roadblocks along the way, but I will at least try to post a new recipe whenever I can.

20170209_114055

So, couple of weeks ago, I tried this truly delicious bean curd stir fry with plenty of veggies coated in a delectable sweet-spicy-tangy sauce. That dish used fried bean curds that were kind of squishy and strangely airy. While I enjoyed every bite, I did feel a little overwhelmed with the amount of sliced onions in it. As I was silently chewing every bite, I tried to make a mental note, no, no, more like a package of memory filled with the taste, smell and texture of each bite. Why you ask? Well, I do that quite often, at least as often as I try a bite of a new dish somewhere that I would like to recreate with my own little twist.

20170209_111738

Today would have been the perfect day to succumb to the comfort of eating that dish for lunch. Alas, we were hit with the biggest snowstorm of the season and the family was home-bound. Even though I had already prepared meals ready to be warmed for lunch, something in me kept nudging me to open the refrigerator and take out the ingredients to whip up some spicy and tangy tofu stir fry.

20170209_113804

Little bit of this, little bit of that and before I knew it, a super satisfying, flavor-rich tofu dish was born!

20170209_114045

Spicy and Tangy Tofu Stir Fry

  • Servings: 4-6
  • Print

Ingredients
1 Pkg extra-firm tofu
3 tablespoon cornstarch
1 tablespoon Thai red curry paste
1 tablespoon soy sauce
1 tablespoon rice wine vinegar
3 tablespoons finely chopped garlic, divided
3 green onions, green part finely sliced and divided
¼ cup oil
4 oz sliced white or baby bella mushrooms
3 cups broccoli florets
½ cup sliced red onion
Few dried red chillis
Sauce:
2 tablespoons soy sauce
1 tablespoon rice wine vinegar
1 tablespoon Sriracha sauce
1 tablespoon cornstarch

Preparation:
1. Cut tofu into bite size pieces. Toss with cornstarch.
2. Mix the curry paste, soy sauce, rice wine vinegar and garlic. Coat tofu cubes in the sauce and set aside for 10 minutes.
3. While tofu is marinating, prepare the vegetables.
4. Mix the ingredients for the sauce and set aside.
5. Heat a large wok or frying pan over medium high heat and add oil.
6. Fry the tofu cubes till golden brown and let drain on paper towel.
7. When all the tofu is fried, drain excess oil, leaving about a tablespoon in the pan.
8. Saute the reserved garlic, red chilli and onion.
9. Add the mushrooms and broccoli and flash cook for another 3 minutes or so.
10. Toss in the fried tofu pieces and top with the reserved sauce.
11. Stir and continue to cook till the sauce thickens and coats the vegetables and tofu.
Serve the stir fry with steamed rice or over cooked rice noodles.

Croquembouche

20151205_1704561

Happy New Year everyone! Wow, we are already done with the much awaited holiday season and about a week into 2016! Seriously, where does the time fly! So, this is to prove the that I did actually work on this recipe at the beginning of the year – to be more precise, a few days into January 2016! Wow, how unexpected life could be!

20151206_1025431

I hope this year is off to a great start for all of you! Did anyone make any lofty resolutions? I didn’t! I am finally in terms with the fact that, you either want to do something or not – regardless of whether it is your latest and greatest resolution or not! Honestly, the timing couldn’t be better! Why would you want to try this absolutely show-stopping creation right after all the indulgence in fine things! Less than 2 weeks before the waists start expanding seem like THE perfect time to share this recipe with you all! PLEASE…I really mean, PLEASE, don’t let the pictures fool you into thinking this recipe is super hard! It really is not! Believe me!

This croquembouche recipe (inspired by a recipe on Food Network) is one such thing! It’s true that you can’t stop with one, but if you want to have your cake and eat it too, then, yes, you can pull together all your willpower and stop with one! It’s a satisfying sweet treat that satisfies your sweet tooth without adding hundreds and hundreds of calories!

OK, before you to the recipe, let me warn you not to get spooked by the ingredient list or the long directions. It’s not all the bad. Breeze through the recipe first to get a feel for how very easy the recipe is so you know what to expect. It’s really a pretty fool-proof recipe with an amazing end result. Also, if you are not keen on making the caramel, you can easily skip it! The taste will still be amazing without the caramel coating.

DARN, how I wish I had taken a picture of the little baby after the first bite, revealing the delicious, creamy filling inside! (Note to self: It’s likely you will make this again this holiday season, so can you please post a picture showing the yumming filling(s) inside?)

Croquembouche

  • Servings: 12?
  • Print

Ingredients
¼ oz packet unflavored gelatin
4 cups milk
1 teaspoon vanilla essence
12 large egg yolks
1 cup sugar
6 tablespoons cornstarch
¼ teaspoon salt
5 tablespoons unsalted butter
½ cup semi sweet or dark chocolate chips
1 tablespoon instant coffee
1½ cup heavy cream
10 tablespoons unsalted butter, cut into pieces
1 ½ teaspoon sugar
½ teaspoon salt
1 ½ cups all purpose flour
6 large eggs
3 cups sugar
3 tablespoons light corn syrup

Preparation

1. Begin by preparing the cream filling. Sprinkle the gelatin over ¼ cup of cold water in a small bowl and let it soften (bloom).
2. Measure out the milk in a heavy bottom pan. Add the vanilla and bring a simmer over medium high heat. Once the milk starts to simmer, remove from heat and set aside.
3. Whisk the egg yolks, 1 cup sugar, cornstarch and ¼ teaspoon salt in a medium bowl until smooth. Gradually whisk one-third of the milk into the egg mixture to temper the yolks. Add rest of the milk and whisk together. Return the pan over medium heat and cook the mixture while constantly whisking the mixture.
4. Cook the custard till the mixture boils and thickens. This will take about 5 to 6 minutes. Continue cooking till the mixture turns into custard consistency. Remove the pan from the heat and stir in the butter, a tablespoon at a time. Add in the softened gelatin.
5. Microwave the chocolate chips for 30 seconds, stir and heat again in 30 second increment till the chocolate is fully melted and smooth. Dissolve the instant coffee in 2 tablespoons of hot water. Stir in the coffee and chocolate into ½ the custard filling. Keep the other half plain. Cover both the bowls with plastic wrap with the wrap touching the surface to prevent any film from forming on top and chill the custard for 2 hours.
6. When ready to fill the puffs, whip the heavy cream into soft peaks. Fold half of it into the vanilla filling and the other half into the chocolate filling.
7. Transfer each filling to a large pastry bag with a 1/4-inch tip and set aside.
8. Prepare the pastry puffs while the custard is cooling. Preheat the oven to 450F.
9. Bring 1 ½ cups of water, remaining butter, sugar and salt to a simmer in medium saucepan. When the butter melts completely, remove the pan from the heat and stir in the flour with a wooden spoon to make a paste. Return the pan to heat and cook stirring constantly till the mixture pulls from the side and turns shiny. Remove from heat and let cool slightly.
10. Transfer the paste to a stand mixer with the paddle attachment and start mixing on medium low speed for about a minute. Beat in the eggs, one at a time till fully incorporated.
11. Transfer the dough to a large pastry bag with a 1/2-inch tip. Line 2 baking sheets with parchment paper and pipe 1 1/2-inch balls of dough onto the paper. You should get about 40 plus dollops.
12. Smooth out any pointy tips of the piped dollops with a wet finger. Bake for about 15-20 minutes, till the dough is puffed. Lower the temperature to 350f and bake until the puffs are golden and feel light. Turn off the oven and keep the puffs inside for another 10 minutes or so. Remove the puffs to a cooling rack and let cool completely.
13. Assemble the croquembouche as close to serving time as possible. Fill half the puffs with chocolate cream and the other half with vanilla by piping the cream from the bottom. You can lightly push in the piping from the bottom and squeeze the filling till the puff feels pretty full. Take care to avoid overfilling so the custard doesn’t explode out of the puffs.
14. Let the filled puffs chill in the refrigerator for 30 minutes or so.
15. To assemble the puffs as a tower, you need to make the caramel. Mix the 3 cups of sugar, corn syrup and 1 cup water in a saucepan, cover and bring to a boil over high heat. Boil the syrup till it turns deep amber. Take care not to burn the caramel. Another way to do this is to use a candy thermometer and boil the syrup till it reaches hard candy stage.
16. Immediately dip the bottom of the saucepan in a large bowl of ice water for a few seconds to stop the cooking. Let cool for a couple of minutes. The syrup should still be quite liquidy.
17. Partially dip each filled puff into the caramel and let the excess drip off. Arrange the puffs around the circle. If the caramel hardens, microwave until soft, 45 seconds.
18. Fill the base circle with more puffs for stability, then continue building a conical tower of smaller circles.
19. Dip the tip of a fork into the caramel and wave it around the tower, letting the syrup fall in strands around it. If the syrup is on the liquidy side, the syrup might not form the web look you are after. Let the syrup cool slightly and drizzle it slowly so it will cling better to the puffs and create the web look.

Penne with Chicken and Red Peppers in Light Cream Sauce

20161106_0935501

Where did the last whole year go??! I simply can’t believe it’s been over a year since my last post back in November 2015! Thank you for those of you that continued to pop in to refer to my old recipes! I have no sound reason or excuse for not posting here over the past year. I thought about it almost every other day, felt guilty, but didn’t quite take the time to translate that to action. But, here I am today, with a renewed enthusiasm to post again – and what better way to kickoff the new season (both the Fall season and my season 2 of blogging) than share with you a simple recipe for a comforting dish of pasta with chicken and red peppers in a light cream sauce!

This dish really does together in a snap! All you need is some cut-up boneless/skinless chicken (thighs or breast), red peppers, some light cream, pasta and basic seasonings such as Italian herb mix and garlic. You can work on the chicken and red pepper sauce while the pasta cooks, so you can just toss the pasta into the sauce as soon as it is done! What is even more appealing about this recipe, since it is super quick to make, this could easily be a weeknight dinner recipe!

So, grab the few ingredients listed below and start whipping up a comforting bowl of pasta for tonight! And, oh, if you so desire, stir in some cut up spicy chicken Andouille sausage with the chicken for an extra special treat!

20161106_1753451

Penne with Chicken and Red Peppers in Light Cream Sauce

  • Servings: 8
  • Print

Ingredients:
1 16-oz pkg of penne pasta (I used vegetable kind)
1/4 cup chopped onion
2 tablespoons finely chopped garlic
2 tablespoons olive oil
1 large red bell pepper, cut up into bite size pieces
1 1/2 pounds boneless/skinless chicken, cut up into bite size pieces
1 cup canned fire-roasted diced tomato
1/4 grated Parmesan cheese
1/4 cup light cream
Crushed red pepper, Salt and Pepper to taste
Extra cheese, if desired

Preparation:
1. Bring a large pot of water to boil and cook pasta according to directions.
2. While the pasta is cooking, heat the olive oil in a large skillet over medium high heat. Saute onion and garlic for a minute and add the red peppers. Stir often and cook until the peppers are a bit charred.
3. Add chicken to the pan and continue to saute till it cooked through.
4. Slowly add the tomato to the pan and season with salt, black pepper and salt to taste. Continue to cook for another 3 minutes.
5. Mix in the grated cheese and light cream. Reduce heat and simmer till everything melds together (about 3 minutes).
6. Turn off heat and toss in the cooked, drained pasta. Serve immediately.

Tip: Leftover pasta can be transferred to an airtight container and kept in the refrigerator for another meal mid-week.

Autumn Pear Muffins

20151103_190809

My calendar says we are into November! That means, we have fallen back an hour and old Mr. Winter is looming closeby! Autumn colors should have vanished by now and the trees should be as bare as a smoky BBQ rib, licked clean! (how I miss summer!); air outside should be crisp and cool prepping our skin for the winter freeze! But, what a treat that the fall foliage is still lurking and the temps are so atypical for November! Seriously, it was in the 70’s one day this week! I am definitely not complaining by the slightest bit! Linger as long as you would like warm temp! The longer you linger, the shorter will be winter! (guess vestiges of my poetry days are still around!)

20151103_170029

I digress. So, yes, the warm temps and abundance of sunshine did the obvious – put me a great baking mood! I was all out of homemade muffins that I could easily pack for kids’ breakfast or snack and decided to bake a batch. It’s autumn after all, so the big question was whether to bake apple or pear muffins! Apple somehow makes you believe, summer just eased into early fall! Pear on the other hand kind of serves as a gentle push that nudges you into winter! Wouldn’t you agree? So, anyway, I had both the fruits in abundance, but caved in for the latter! Yum, my very first attempt at a pear muffin recipe.

20151103_171315  20151103_172052

I figured pears would easily substitute for apples in my usual muffin recipe, but I wanted to try a new one. As much as I would like to say this is my original recipe, it is not. The original is found here. I did make some modifications to give it my own little twist. Original ratios still remain though. I swapped out the milk with buttermilk (my favorite in baked goods) and added a streusel topping. And caramel! The last addition is not recommended at all as it is best done after baking and right before serving. Even though the caramel added another layer of sweetness to a not-overly-sweet muffin, I didn’t have the appearance I was going after! Oh well!

20151103_174417

These muffins are beyond delicious! Super autumny, super delicious, super moist and simply everything a muffin should be! 🙂 So, seriously, if you never tried any of my other recipes at all, you have to try this! It’s that good!

20151103_174428

Autumn Pear Muffins

  • Servings: 12
  • Print

Ingredients
1/2 cup dark brown sugar, lightly packed
1/4 cup sugar
1 stick unsalted butter, softened
2 large eggs
1 teaspoon vanilla extract
1 cup all-purpose flour
1 cup white whole-wheat flour
2 teaspoons baking powder
1/2 teaspoon baking soda
2 teaspoons ground cinnamon
1/2 teaspoon ground nutmeg
1/2 teaspoon salt
1/2 cup buttermilk
3 medium sizes Bosc pears, cut into 1/2′ cubes

Streusel topping
2 tablespoons of the dry mix (see instructions)
1/4 cup old-fashioned oats
1/4 teaspoon ground cinnamon
1 tablespoon brown sugar
Dulce de leche, optional (lessons learned: Drizzle after baking!)
1 tablespoon butter
1 tablespoon chopped crystalized ginger

Preparation:
1. Preheat oven to 425F. Spray a muffin pan or line with baking liners. Set aside.
2. Sift the flours with baking powder baking soda, spices and salt. Take 2 tablespoons of the dry mix and set aside for the streusel topping.
3. Prepare the streusel by mixing all the streusel ingredients till they are crumbly. Set aside.
4. In a large bowl, cream the butter and sugar till light and fluffy.
5. Add eggs, one at a time, mixing well after each addition. Add the vanilla and beat well.
6. Using a rubber spatula, stir 1/3rd the flour, folding lightly. Add half the butter milk. Add the other third of the flour and follow with remaining buttermilk. Fold in the remaining flour with the pears. As with any muffin recipe, don’t overmix! The batter will be quite thick and super delicious looking! 🙂
7. Spoon the batter evenly across all 12 muffin cups. Sprinkle the streusel topping over the batter and lightly press so they stick to the batter. Drizzle some dulce de leche (caramel) over the streusel. Place in the oven, reduce heat to 400F and bake for 22-25 minutes.
8. When the muffins are done, remove from the oven, let stand for 5 minutes, move to cooling rack and let them cool completely. The muffins can be stored in airtight container at room temperature for 3-5 days.

Pan-Grilled Tilapia with Garlic Rainbow Chard

20151031_194819

I love greens! Spinach, kale, collard, mustard…but I had never tried chard before! So, I was super excited when a colleague brought in a couple of bags of “excess” produce that she had from her membership in the CSA (Community Supported Agriculture). My “loot bag” included a large earthy turnip, a big bag of peppery arugula and a beautiful bunch of sweet rainbow chard! I must say, there is something about the rainbow chard…its deep green leaves with colorful veins and stems in purple, orange and green is definitely a thing of beauty!

20151031_190421  20151031_190625

Driving home, I made a mental note of how I was going to use up all that beautiful, fresh produce! I decided on South Indian style mixed vegetable and lentil stew (sambar) with the turnip, thin crust pizza (I used a prebaked crust made of whole wheat and kamut flours) with pesto, mushrooms and arugula and…tilapia with rainbow chard sautéed in extra-virgin olive oil with a healthy doze of minced garlic!

20151031_191206  20151031_192149

This tilapia/rainbow chard dinner is a snap to prepare. It requires very few ingredients and takes about the same time as watching a pot of water come to boil and cooking a box of pasta! Instead of a bowl of plain, cooked pasta in less than 20 minutes, you get a beautifully plated! I sort of missed the summer BBQ flavors and opted to go with that for this dish! The chard is super simple to make – just garlic, pinch of salt and bit of olive oil! I think the green is so delicate that anything beyond this simple combo might just overpower its natural flavor and taste!

20151031_194847

Isn’t everyone talking about the health benefits of eating fish! So, go for it! Grab yourself a few filets and whip up this dinner in a snap!

Pan-Grilled Tilapia with Garlic Rainbow Chard

  • Servings: 4
  • Print

Ingredients
4 Tilapia filets, skin removed
1 tablespoon BBQ seasoning or other seasoning of your choice
1 tablespoon olive oil
1 bunch of rainbow chard, chopped up
3 large cloves of garlic, finely minced
1 tablespoon extra virgin olive oil
Pinch of salt

Preparation
1. Lay the tilapia filets on a large plate and coat both sides with the BBQ seasoning.
2. Heat a tablespoon of oil in a large skillet over medium high heat.
3. Place the fish in the hot skillet and “grill” for 4-5 minutes on each side. The fish is done when you can flake it easily with a fork.
4. Wipe down the pan and return to heat. Add the remaining tablespoon of oil. Add the rainbow chard and garlic and saute for 3-4 minutes.
5. Serve the fish immediately over a serving of sautéed chard for a simple, healthy and delicious meal!

20151017_204609

First and foremost, I must apologize to anyone that visits this blog for my extreme tardiness in posting new recipes lately. I won’t lie – I truly, honestly, sincerely felt so guilty not doing it, but something or the other kept me away. So, here I am, trying to keep up my promise to post the recipe for the simply wonderful and autumny apple muffins that I had posted a picture of earlier this week!

20151017_200721  20151017_200938

Something about fall and the crisp air! As the temperature drops, apples take on a whole new dimension! They somehow make fall the best season and they also try to comfort you into believing winter wont be that terrible after all. I have tried to play around with several recipes, but wanted to try a recipe that not only looked great, but also tasted wonderful! That’s when I stumbled upon this recipe on Sally’s Baking Addiction. She has great recipes on her site – so if you are looking for some comfort recipes, you should visit her site. 🙂

20151017_201535  20151017_204212

So, back to this recipe…true to what she mentions in her recipe, these muffins do rise well, and taste so cake-like and full of apple goodness. I did use some apple cider in the wet ingredients per one of the reader comments and skipped the glaze. Honestly, I don’t think the glaze is really needed except for that picture perfect oozy look! Yum!

20151020_061235

Whip up these muffins this weekend and watch them disappear!

20151020_061331

Autumn Apple Muffins

  • Servings: 12
  • Print

Ingredients
Muffin Batter
1/2 cup unsalted butter, softened to room temperature
1/3 cup dark brown sugar, packed
2 tablespoons granulated sugar
2 large eggs at room temperature
1/2 cup plain, fat free Greek (or regular) yogurt
1 teaspoon ground cinnamon (better the quality, better the cinnamony goodness)
2 teaspoons vanilla extract
1 cup white, whole wheat flour
3/4 cup all-purpose flour
1 teaspoon baking soda
1 teaspoon baking powder
1/2 teaspoon salt
1/4 cup apple cider
2 small Gala apples (or any firm kind), peeled and chopped into 1/4 inch cubes

Crumb Topping
1/4 cup packed dark brown sugar
1/4 cup rolled oats
1 Tablespoon granulated sugar
1 teaspoon ground cinnamon
1/4 cup unsalted butter, melted
1/4 cup all-purpose flour

Preparation
1. Preheat oven to 425F. Line a muffin pan with 12 liners and set aside.
2. Prepare the crumb topping: Combine all ingredients and gently toss together till they are crumbly. Set aside (wow, that was easy!)
3. Using a handheld mixer, cream butter. Add the sugars and beat for another 2-3 minutes.
4. Beat in the eggs, yogurt, ground cinnamon and vanilla extract. Scrape down the sides and bottom of the bowl and set the bowl aside.
5. In a separate bowl, toss together the flours, baking soda, baking powder and salt. Pour the wet ingredients into the dry ingredients and slowly mix with a rubber spatula or whisk. Add the milk, gently stirring to mix in. Small lumps are OK. Fold in the apples.
6. Spoon the muffin batter evenly between the 12 muffin cups. The tins will be quite full, which is great for making tall-domed muffins!
7. Distribute the crumb topping evenly over all the batter, pressing lightly with your hands so the crumbs will stick to the baked muffins.
8. Bake the muffins for 5 minutes at 425°F, then reduce heat to 350F and continue baking for another 20-25 minutes, till the top is golden and muffin tests done.
9. Let the baked muffins stay in the pan for about 5 minutes before removing them to a cooling rack to cool completely. Cooled muffins can be stored at room temperature for about 5 days. These freeze well as well.

Enjoy!

Easy Basil Fried Rice

20150822_130033

I love food! I guess that’s quite obvious by now! But seriously, I do enjoy a variety of cuisine – sambols and rotis from my homeland, Sri Lanka, pasta dishes characteristic of Italy, slow rendered duck breast and macarons from France, tacos and fajitas from south of the border, curries and rice dishes from India, Pakistan, China, Thailand….And the list goes on!

20150822_120328

Each cuisine is unique and unparalleled with incredible flavor combinations, textures, colors and taste! I have a bit of a special fondness for Thai dishes – perhaps it’s the coconut milk and ample use of green chili. So, I had this craving for a yummy Thai fried rice, but without having to go for takeout.

20150822_122203

I was pretty sure I had the basic ingredients handy – basil, fish sauce, palm sugar, rice, eggs and a medley of vegetables. A quick look through the refrigerator and pantry confirmed my hunch! So, after perusing through a few recipes for inspiration, I decided to use my own pseudo blend of Thai seasonings! I figured even it didn’t taste Thai at all, it will still be pretty darn good. And good it was! In fact, it was probably better than good. My family loved it and both my kids (one who hates fish sauce and the other who has a pretty discerning taste for fried rice) actually verbally acknowledged that the rice was good. That, in my books, is a pretty big win!

20150822_122415  20150822_123131

This rice is especially good, made with a day old rice kept in the refrigerator. If you are like me and have a freshly cooked batch, just spread 2 cups of the cooked rice on a plate and chill till you prepare the ingredients. It worked fine. I think day-old rice just helps to keep the kernels separate – like in restaurants.

20150822_125958

Easy Basil Fried Rice

  • Servings: 4
  • Print

Ingredients
2 cups cooked rice, preferably a day old kept overnight in the refrigerator
2 tablespoons canola oil
2 cups of chopped vegetables of your choice (I used carrots, onions, savoy cabbage and celery)
2 eggs
1/4 cup roughly chopped basil leaves

Seasoning:
1 tablespoon fish sauce
1 tablespoon soy sauce
1 tablespoon minced ginger
2 large cloves of garlic, minced
2 tablespoons ketchup (I used tomato sauce)
1 tablespoon sugar (I used palm sugar)
1 tablespoon rice vinegar
Sprinkling of crushed red peppers, optional

Preparation
1. In a small bowl, combine all the seasoning ingredients. Set aside.
2. Heat a large saute pan or wok over high heat. Add the oil and saute the vegetables for 3-5 minutes.
3. Add the rice and seasoning mix. Toss to mix thoroughly. Spread the rice and vegetables across the pan to allow them “fry” a bit more” – another 3 minutes or so.
4. Push the rice and vegetables to the edge of the pan, creating a well in the center for the eggs.
5. Lightly beat the eggs and pour in the center of the pan. Let set and scramble. Mix the egg with the rice and vegetables.
6. Remove from heat and serve with meat or vegetable stir fry and/or an Asian cucumber salad.

Blueberry Cheesecake Ice-Cream

20150803_211856

Blueberry season is winding down! This to me means two things…get to a u-pick farm FAST for several pounds of the blue gems and finding as many ways to use them up throughout the year as possible!

20150802_152106

Throughout the past several years, July has become the month of continuing our family tradition of picking blueberries at a local farm! I get all excited as soon the farms open for the season. I immediately start to think about how many pounds to pick so I have enough to freeze for the rest of the year. Usually, if we pick about 15 pounds or so, they last till about March or April. That’s a lot of picking! And perhaps that’s why my kids never get super excited about getting ready for this day! I guess the summer heat, rivers of sweat pouring down your back and all the patient work to pick the bluest berries could possibly make you a bit less excited! 🙂 But, to their credit, they always go with us, try their best to do their part, and even have a bit of fun!

20150802_151814  20150802_153858

So, after couple of hours of sweating buckets in the scorching sun, we managed to pick almost 13 pounds, little shy of what I would have ideally liked! After sorting through, rinsing, drying and freezing most of the berries, I saved just enough to try hand at my first batch of ice cream – blueberry cheesecake ice cream, combining two of my favorite things!

20150802_154046  20150802_154233

The original recipe is found on the Eagle Brand website. With couple of minor tweaks, including substituting bit of milk for some of the heavy cream and incorporating crushed graham crackers, the ice cream turned out to be quite something! Although the recipe called for at least 4 hours of freezing, mine didn’t quite freeze to an ice cream consistency at 4 hours. But that didn’t stop me from serving this as soft serve for dessert following dinner. It was delicious! I did have enough to let freeze all the way. Next day, it was perfect! You may need to let the container stay at room temperature for about 5 minutes to make it easy to scoop.

This is the scoop served "soft-serve"

This is the scoop served “soft-serve”

This recipe is super easy to whip up! Literally! So, go ahead and give it a try! You will be happy you did!

20150803_211910

Blueberry Cheesecake Ice-Cream

  • Servings: 6-8
  • Print

Ingredients
1 cup blueberries
1 tablespoon lemon juice
2 tablespoon sugar
3/4 cup heavy/whipping cream
1/4 cup milk (I used 1%)
Lemon zest from 1/2 lemon
1/2 container sweetened condensed milk
1/2 package reduced-fat cream cheese
1 teaspoon vanilla
1/4 cup crushed graham crackers

Preparation:
1. In a small pan, simmer blueberries, lemon juice and sugar till the berries start to burst. Continue to simmer for about 5 minutes till the sauce thickens a little. Remove from heat and let come to room temperature.
2. In a medium bowl, whip the heavy cream till stiff peaks form. Keep aside while you proceed to the next step.
3. In another medium bowl, using hand held mixer, combine the condensed milk, milk and cream cheese till smooth. Add vanilla and the lemon zest.
4. Slowly incorporate the whipped cream into the condensed milk mixture.
5. Layer one third of the blueberry mixture into a plastic container (with a tight lid). Ladle in 1/2 of the ice-cream base. Sprinkle a tablespoon of crushed graham crackers. Now, gently swirl the two layers. Repeat with the remaining berry mixture, ice-cream base and graham crackers. Cover and freeze till completely set. This will take about 4-5 hours.

Serving tip: Let the ice-cream stay at room temperature for about 5 minutes to make it easy to scoop! Serve with additional blueberries and a sprinkling of crushed graham crackers!

Lighter Chocolate Chip Bread

20150717_060203

Chocolate! What is not to love about it!!!

This recipe is a spinoff from the original recipe for Cinnamon-Swirl Chocolate Chip Bread by Sally’s Baking Addiction. The first time I baked this bread, I must confess I felt like I was transported to a great pastry shop somewhere! The smell of chocolate and cinnamon permeated the entire house and had my kids dash to the kitchen wondering what was baking!

Original Recipe from Sally's Baking Addiction

Original Recipe from Sally’s Baking Addiction

To top it off, I took some of the bread to work that morning (yes, the bread still slightly warm…needless to say, everyone raved about it and I obviously gave credit to Sally. I knew after the first loaf that this recipe was going to be keeper, but I wanted to find a way to “healthify” it up a little!

I thought cutting down the sugar content was quite easy to accomplish. Sally’s recipe calls for 1/2 cup of sugar with cinnamon to use in the cinnamon layer. Personally, I could do without it! So, there it is – my first calorie-saving switch was to eliminate the cinnamon sugar layer and instead use 1 teaspoon of cinnamon in the batter!

20150716_200228  20150716_200355

Calorie-saving tip #2 – replace some of the oil with unsweetened applesauce! I substituted half the oil with the applesauce and you wouldn’t miss much of the moistness! Next time, I am going to try it with pureed prunes instead of applesauce to see how it turns out! I would imagine it will result in an equally delicious loaf with darker color! Yum!

20150716_201156

Final nutrient-boosting tip (#3) – substitute 3/4 cup of the all-purpose flour with whole-wheat. Yes, yes, white flour baked goods are delicious, but at least I feel a bit better knowing almost half the flour is whole-wheat! 🙂

"Lightened Up" Version - Can you tell the difference except for chocolate chip topping vs. chopped chocolate?

“Lightened Up” Version – Can you tell the difference except for chocolate chip topping vs. chopped chocolate?

This recipe is pretty simple to put together. As usual, measure out the dry ingredients, whip up the wet ingredients and fold in the dry into the wet making sure not to release your stress during the mixing process! 🙂 Gentle does it! My recommendation is to save your stress release for another bread recipe that calls for extreme amount of kneading! Gentle mixing results in a lighter bread that is not tough! And oh, another word of caution…this bread takes a long time to bake – almost an hour! So, you have to be patient!

20150717_060136  20150717_060244

Enjoy!

Lighter Chocolate Chip Bread

  • Servings: 12
  • Print

Ingredients
1 1/4 cup all-purpose flour
3/4 cup whole wheat flour
1 teaspoon baking soda
1/2 teaspoon salt
1 teaspoon ground cinnamon
1/2 cup mini or regular semi-sweet chocolate chips
1 egg at room temperature
1/2 cup dark brown sugar
1/4 cup granulated sugar
1 cup buttermilk
1/3 cup unsweetened applesauce-oil mixture (I spooned in applesauce halfway up a 1/3 measuring cup and topped with oil)
1 teaspoon vanilla

Optional:
2 tablespoons of sweetened coconut flakes
1 tablespoon of chocolate chips

Preparation:
1. Preheat oven to 350F; Spray a nonstick loaf pan with cooking spray on all sides and set aside. Alternatively, you can lay a piece of parchment paper on the bottom of the pan and spray over the sides of the pan. Parchment helps to remove the loaf easily from the pan.
2. Measure out the dry ingredients and sift into a medium bowl.
3. In a large bowl, whisk the egg. Mix in the sugars till all lumps are broken down. Stir in the buttermilk, applesauce-oil combo and vanilla.
4. Slowly stir in the dry ingredients, along with chocolate chips taking care not to overmix.
5. Spoon the batter into the prepared loaf pan. Top with some sweetened grated coconut (optional) and additional chocolate chips.
6. Bake for about 50-55 minutes till the bread is baked all the way through (confirm with the usual toothpick trick!).
7. Remove from oven, let cool in the pan completely. If you are in a hurry like I was the first time I baked, let cool for 10 minutes in the pan and carefully remove taking care not to scorch yourself (not advisable). Transfer to a cooling rack.

Bread will stay fresh in a tightly closed container at room temperature for about 5 days.
Enjoy!