Coconut Curry Soup with Chicken and Vegetables

20150622_203129

True it is July and there is just a glimmer of hope that it might actually start to feel like summer, but that shouldn’t stop you from wanting a comforting bowl of soup for a meal, right?! Well, let’s just assume that’s the case! I know a bowl of soup sounds far more inviting in the cold and dreary winter months, but hey, with this intensely flavored bowl, you might actually feel like you are vacationing somewhere in Thailand or Sri Lanka! 

20150707_180818  20150707_181907

The idea for this recipe originated from a lunch break conversation with a colleague who was longingly taking out a warm bowl of homemade soup from the microwave. It smelled great and she went on to add that she was so sad that her last bit of soup made in bulk was going to be consumed! She quickly summarized the recipe for me while I made a mental note of just three things – curry powder, coconut milk and whatever you want to throw in to make it a meal! I also remembered with a smile a small Ziploc bag of kefir lime leaves that I had in the freezer from an online purchase eons ago! I knew adding that would mean I would get an addictive aroma of combination of curry, coconut and citrus! What not to love about this, huh!

20150707_183439  20150707_184319

I didn’t have to wait around to make this recipe. I had all the ingredients on hand – you think it is weird? 🙂 Especially those kefir lime leaves! Oh well! By the way, for those of you who wish to avoid meat, you can easily substitute the chicken with tofu and the chicken broth with vegetable broth. I think that in essence will make this recipe vegan! A really delicious one!

20150707_191411

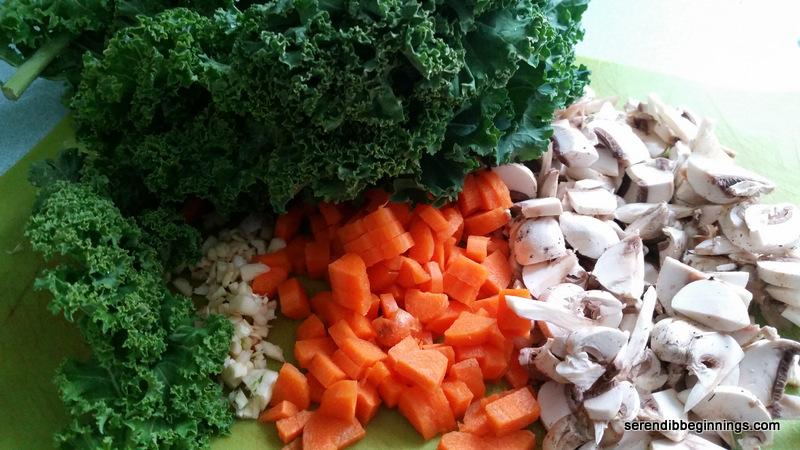
So, armful of assorted vegetables, a small tray of chicken thighs and a little of this and that, voila, the recipe was concocted in a flash! Seriously, don’t let the list of ingredients discourage you from trying this out. It is really a snap to whip up and the end result is….honestly, I think you should just make it and tell me yourself!

20150622_203138

Coconut Curry Soup with Chicken and Vegetables

  • Servings: 6
  • Print

Ingredients
6 chicken thighs, skin removed
Salt and pepper to season the chicken
2 tablespoons canola oil, divided for use
2 large carrots, peeled and sliced into 1/4″ inch thick slices
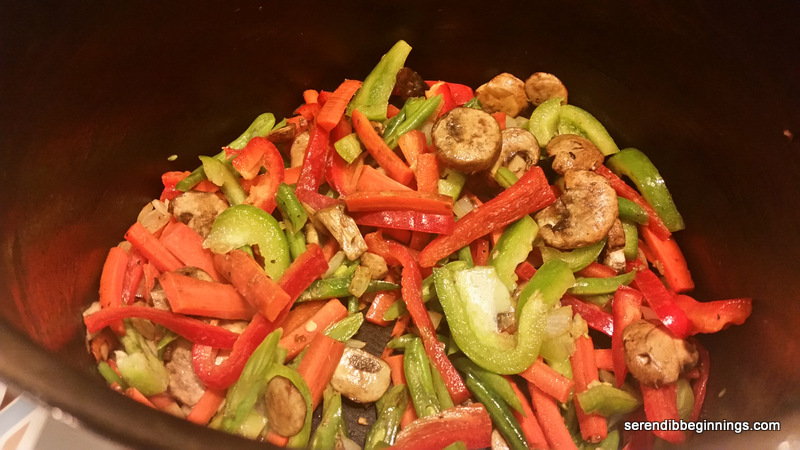
1/2 large red pepper, sliced into 2″ strips
1/2 large green pepper, sliced into 2″ strips
1 cup sliced mushrooms (button or baby bella)
1/4 cup diced onions
2 cloves garlic, finely minced
1 tablespoon mild or medium curry powder
2 kefir lime leaves, zest of 1 lime OR 2″ piece of lemon grass, crushed
Zest from 1 lemon
Juice from 1 lemon
1/2 cup thick coconut milk
1 32-oz container chicken or vegetable broth
1 cup of water
2 tablespoons of soy sauce
Dash of crushed red pepper, optional
3 corn on the cobs, cut in half (optional)
1 cup of cooked noodles (rice or Udon preferred) – Optional

Preparation:
1. Season chicken pieces with salt and pepper and set aside.
2. Heat a large, heavy bottom pan over high heat and drizzle a tablespoon of oil. Place the chicken thighs in a single layer and brown on all sides. Remove from pan and set aside.
3. Add the remaining oil to the same pan and add the vegetables, including onion and garlic and saute for a few minutes.
4. Stir in the curry powder and cook for another minute or two till the raw smell of the curry powder fades away. Add in the browned chicken pieces.
5. Slowly add the chicken broth, water and soy sauce. Adjust the amount of soy sauce to your taste. Add in the kefir lime leaves, lemon zest and lemon juice. Cover the pan with a lid, reduce heat to medium and let the soup simmer for 30 minutes till the chicken is cooked through and vegetables are tender.
6. Reduce heat to low and slowly stir in the coconut milk, reserving a few tablespoons to top the soups before serving.
7. Serve hot with some noodles (if using) and a sprinkle of chopped cilantro.

You can refrigerate any leftover for consuming later. Just know that when you reheat, the soup may look a bit “split” because of the coconut milk trying to separate from the soup. The taste will still be great!

Citrusy Asian Salad in Crispy Wonton Shells

20150613_150428

It’s been a very hectic week and I didn’t have the chance to go by the grocery store like I had hoped to. There was a potluck BBQ party on Saturday and I had to figure out a no-fuss, yet rather light summery appetizer to take along.  I know I had a tray of shaved beef in the freezer. Since one of my kids has more or less sworn off beef, I figured I could use the meat for an appetizer.

After a mental run down of what seemed like dozens of ideas, I decided on a summery, citrusy salad that could be eaten as a finger food. Ah, what better vehicle to hold the salad than crispy wonton shells! Have you tried those? I must say, this was my first time and I was quite impressed! The shells remained partially crisp the next day, even after a light drizzle of the delicious citrusy-Asian dressing.

It is super easy to make the shells. Just spray a muffin pan and gently mold a wonton wrapper into a general cup shape and bake at 350F for about 7 minutes or so. Similarly, shaved beef is super easy to cook. Fast too! Just season with whatever – in this case, an Asian-inspired marinade, and just saute for a few minutes.

20150613_125804

The salad dressing, which probably is the best part of this entire dish, is a simple combination of lemon juice, honey, teriyaki sauce, few drops of dark sesame oil and a dash of salt and pepper.

20150613_131137

Just layer on the salad ingredients and drizzle the dressing right before serving. These cups were a huge hit at the gathering and people raved about the dressing. Addition of lemon zest does take it a whole new level, so don’t hold back on it!

20150613_150435

So, what are you waiting for? Get ready to impress your friends and family at the next gathering with this super light, yet super delicious Citrusy Asian Salad in Crispy Wonton Shells!

20150613_150452

  • Servings: ”18″
  • Print

Ingredients
18 wonton shells
cooking spray
2 cups of Spring green mix
1/4 cup thinly sliced salad radish
1/4 cup finely minced red peppers
1/2 lb shaved beef
1 tablespoon oil
2 tablespoons reduced-sodium soy sauce
2 cloves garlic, finely minced
1/4 cup finely chopped roasted peanuts
Zest from 1 lemon
Juice from 1 lemon
1 tablespoon honey
2 tablespoons teriyaki sauce
1/4 teaspoon dark sesame oil
2 tablespoons canola oil
dash of salt and pepper

Preparation:
1. Preheat oven to 350F. Spary a muffin pan with cooking spray. Carefully place a wonton wrapper into each of the muffin cups and gently form into shells. Bake for 8 minutes till golden. Remove from oven and let cool in the pan.
2. In a medium frying pan, spoon a tablespoon of oil and heat over medium high heat. Add the beef and quickly stir around till meat is browned. Add the teriyaki sauce and garlic and saute for another 3 minutes. Turn off heat and let the meat cool to room temperature.
3. In the meantime, remove the wonton shells from the muffin pan and carefully arrange them on a large platter. Place a layer of salad greens into each shell. Place about a tablespoon of the sautéed beef and top with radish and peppers. Sprinkle with crushed peanuts. Set aside while you prepare the dressing.
4. In a small bowl, whisk together the lemon zest, lemon juice, teriyaki sauce, sesame oil, canola oil, honey, salt and pepper. Drizzle the dressing over the salad cups right before serving.

Perfect blueberry muffins

20150517_080442

Berries are a perfect way to start off a sunny morning -even a weekday one! Blueberries, strawberries, raspberries, blackberries….I just love them all!

20150515_064109

I hope you have had the opportunity to try my raspberry scones! They are divine. Although I debated another scone recipe this morning, I went for buttery streusel topped blueberry muffin instead. This recipe is adapted from the original at the Café Sucre Farine. The recipe called for the blissful combination of lemon and blueberries! Heavenly!

20150515_065111

This recipe is so easy – I mean it. Even though the original recipe calls for creaming the butter and sugar, I decided to skip that step, mainly because I have made several batches of muffins before and I felt confident the muffins will turn out just fine without this additional step.

20150517_080431

So, grab yourself the basic ingredients I am sure you already have in your pantry and whip up this recipe in time for a great grab n’ go breakfast.

Perfect Blueberry Muffins

  • Servings: 12
  • Print

Ingredients

Crumb topping

3 tablespoons butter, melted
¼ cup demerara sugar
½ cup all-purpose flour
½ cup oatmeal
¼ cup finely chopped almonds

Muffins
1 cup whole wheat flour
1 cup all-purpose flour
1 ½ teaspoon baking powder
½ teaspoon baking soda
½ teaspoon salt
3 tablespoons butter, melted
¼ cup oil
¾ cup sugar
2 large eggs
¼ cup light sour cream
¼ cup milk mixed with 1 tablespoon lemon juice (set aside for 5 min)
Grated lemon zest from 1 lemon
1 teaspoon vanilla
1 ½ cups frozen wild blueberries
Glaze (Optional)
3 tablespoons lemon juice
1 cup powdered sugar

Preparation
1. Heat the oven to 375F. Spray a 12-cup muffin pan with nonstick cooking spray and set aside. You can also use muffin liners.
2. Prepare the streusel topping by combining all ingredients till crumbly. Set aside.
3. In a large bowl, sift together the flours, salt, baking powder, baking soda and sugar.
4. In a smaller bowl, lightly whisk the eggs. Whisk in the sour cream, curdled milk, oil, melted butter, lemon zest and vanilla.
5. Gently stir in the wet ingredients into the dry mixture just until moistened.
6. Fold in the frozen berries taking care to avoid breaking too many berries. I say this because it is inevitable your batter is going have bluish tint running through it no matter how careful you are! 
7. Spoon the batter into the muffin pan. Don’t level the batter. Top with a generous amount of the streusel topping.
8. Bake the muffins for 5 minutes at 375F. Decrease heat to 350F and continue baking for another 20-25 minutes till the tops are golden and the muffin is cooked through.
9. Remove from the oven, let cool in the pan for 5 minutes. Carefully remove the muffins from the tin and let cool on a wire rack till completely cool.
10. While the muffins are cooling, prepare the glaze (optional) by vigorously stirring together the lemon juice and powdered sugar to a “drippable” consistency (say, like honey).
11. Lightly drizzle over the muffins. Let set.
12. Store muffins tightly covered for up to 5 days.

Kiwi-Cranberry-Raisin Bars

Hi folks, it’s been a long time! One of those whirlwind of few weeks and I really missed posting.

20150406_183616

So, what better way to make a come-back than with a recipe that calls for an unlikely combination of fruits. Seriously, kiwi, cranberry and raisin? Yes, yes! And trust me, you won’t be sorry that you invited them to the same party!

20150406_184847

The idea to use kiwi came from having a bag of dried candied kiwis sitting around in the pantry waiting to make an appearance in a recipe – any recipe. This was around the time I was contemplating whether to bake homemade treats for school lunches in an attempt to make them a little less “junk”. Although this adaptation of a Cooking Light recipe still has more sugar than I prefer to add, the website has these at under 140 calories per serving size (and their serving size was larger than how I cut my bars). In my version of the recipe, since I used candied kiwi and sweetened cranberries, I reduced the sugar to 1/2 cup. I guess that’s not too bad – or so I hope!

20150406_191804

These bars have the right sweetness balanced by the fruity firm, chewy texture of the candied fruits. Needless to say, they were quite a big hit with my family. Give it a try!

20150406_192758

Kiwi-Cranberry-Raisin Bars

  • Servings: 24
  • Print

Ingredients
1/2 cup of dried/candied fruits – kiwi, craisins and raisins
1 1/2 tablespoons water
1 cup all-purpose flour
1/2 teaspoon baking powder
1/2 teaspoon baking soda
1/4 teaspoon salt
1/2 cup packed brown sugar
1/4 cup butter, softened
1/2 cup mashed ripe banana
3 tablespoons low-fat buttermilk
1 teaspoon vanilla extract
2 large egg whites
1/3 cup chopped walnuts
Cooking spray
1 tablespoon powdered sugar, if desired

Preparation
1. Preheat oven to 350F. Line a 8-inch square baking dish with parchment paper and spray with non stick cooking spray. Set aside.
2. Sprinkle water over the dried fruits and microwave for 20-30 seconds. Remove from microwave and set aside to cool.
3. In a medium bowl, combine flour, baking powder, baking soda and salt.
4. In a large bowl, combine butter and brown sugar. Use a hand mixer to make the job easier. To this, add the mashed banana, buttermilk, vanilla extract and egg whites one at a time. Mix well to combine.
5. Mix in the dry mixture in two parts just until combined. Fold in the fruits and walnuts.
6. Spoon the mixture into the baking pan and smooth the top.
7. Bake in the pre-heated oven for 25-30 minutes till the top is set and golden.
8. Remove from oven and let cool in the pan for 5 minutes before transferring to a wire rack to cool completely.
9. Cut into 24 pieces. Dust with powdered sugar, if desired.

Store covered in an airtight container for about 5 days.

Special (Diet) Snickerdoodles

20150314_175155

Honestly, I didn’t know what to call this recipe. I came across the recipe somewhere online and can’t seem to trace back my steps. I was searching frantically for a gluten-free, dairy-free, refined sugar-free cookie recipe the other day. As you can imagine, too much “free” meant I was coming up empty with my search results, until I came across this recipe. Even though, it is gluten and dairy free, it was so addictive and delicious, it is definitely going to be a keeper! So, even though the title of this recipe is Special Diet Snickerdoodles, I really have to de-emphasize the diet part as this cookie is too delicious to be a diet cookie!

20150307_175944

I was dismissing all the other recipes as I thought my special guest wouldn’t eat anything with even unrefined sweeteners like maple syrup. Boy, was I glad she actually was OK with that. Yes!

20150314_175209

I couldn’t control my joy when I found out the recipe used almond flour/meal rather than myriads of others that I came across using other not-so-common flours like coconut flour etc. Since I had almond meal and some Vermont maple syrup on hand, this recipe was going to be it!

20150314_175942

This recipe is so quick to make and requires such few ingredients, I am sure this will become a go-to recipe for you even when you don’t have to make this for someone who is gluten and dairy-free!

Special (Diet) Snickerdoodles

  • Servings: 20-24 cookies
  • Print

Ingredients:
2 cups almond flour/meal
1 teaspoon baking powder
1/4 teaspoon baking soda
pinch of salt
1/4 teaspoon ground cinnamon
1/4 cup melted shortening
1/4 cup maple syrup
1/2 teaspoon vanilla essence
1/2 teaspoon ground cinnamon
1 tablespoon stevia or refined sugar

Preparation:
1. Preheat oven to 350F. Line a baking sheet with parchment paper and set aside.
2. Combine almond flour, baking powder, baking soda, salt and 1/4 teaspoon cinnamon in a medium bowl.
3. In a small bowl, combine melted shortening and maple syrup. Add vanilla essence and stir well.
4. Add liquid ingredients to the almond flour mixture and combine to make a wet dough.
5. Make 20-24 equal size dough balls (about 1″ diameter).
6. Stir together 1/2 teaspoon ground cinnamon and stevia (or regular sugar). Dip the dough balls in the cinnamon mixture.
7. Transfer the dough balls to the parchment lined baking sheet. Using tips of your fingers, or glass bottom of a jar, flatten the balls into a disk about 2 1/2″ wide.
8. Bake for about 8 minutes. The center will look soft and uncooked, but the cookies will continue to cook while cooling.
9. Let the cookies cool completely on the tray. Remove then and store in an airtight container.

Curried Ground Turkey


20150310_192657

Of late, my hubby has been doing majority of our grocery shopping. As much as I appreciate his help, I sometimes wish I was the one running to the grocery store – especially when he comes home with 3-pound package of meat or a whole grocery bag full of those fat eggplants! 🙂

20150307_190356  20150307_190542

Such was last week’s grocery run! Among other things, 2 packages of 3-lb pack of ground turkey – and oops, not my usual extra lean version! These were the oh so moist, yet oh so calorific 85% lean version! What to do! Oh well! Since both the packages were promptly placed in the freezer (guess who did it!), I had to use up everything once I thawed a package! 3 pounds of ground turkey and a lazy weekend with nothing to do!

20150307_191715

My kids have been asking for meatballs and I actually wanted to get ground turkey to make a curry! Since I didn’t want to use up all that meat in just two dishes, I added a third! So, my 3 pounder transformed into super moist meatballs, curried turkey and seasoned turkey taco meat! All were pretty easy recipes, so off I started with the curried turkey dish first!

20150307_192726

You don’t need many exotic spices to make this immensely flavorful dish that could be served over rice or with a side of a flatbread such as Indian naan, pita bread or just plain super-crusty bread! You just need a small amount of good quality curry powder!

20150310_192723

Since my dear hubby also brought me a mesh bag full of sweet potato when I specifically asked for 3, I decided to amp up the nutritional value of the curry with the addition of sweet potato cubes and spinach! Don’t wait, grab the few ingredients that are needed and whip up this delicious, semi-nutritious (wish I had the extra lean meat)

Curried Ground Turkey

  • Servings: 4-5
  • Print

Ingredients
1 pound ground turkey (lean or extra lean)
1 tablespoon oil*
1/4 cup chopped onions
3 cloves of garlic, finely minced
1 small sweet potato, peeled and cubed into 1/2″ cubes
1/2 package frozen chopped spinach, thawed and squeezed dry
1/2 teaspoon cayenne
1 tablespoon Madras curry powder
1/4 teaspoon ground turmeric, optional
1/4 cup water
salt to taste
1/4 cup of unsweetened coconut milk, optional

Preparation:
1. Heat a large skillet over medium high heat. Brown ground turkey till lightly brown and cooked through.
2. If you are using higher fat than 90-93% lean turkey, chances are you will have bit of fat accumulating after browning the meat. I usually scoop this out and discard.
3. If the meat mixture is too dry, use the tablespoon of oil*. To the pan, add onion and garlic.
4. Stir around cook for 3-5 minutes. Add the dry spices and salt. Cook for 3-5 minutes.
5. Add the sweet potato and spinach. Gently stir. Add the water and cook covered on low heat for 15 minutes or so, till sweet potato is soft and the sauce thickens.
6. Stir in the coconut milk, if using, and remove from heat.

Serve the dish with steamed rice or your favorite flatbread.

Strawberry Cheesecke Muffins

20150308_154736

Ahh….the first, albeit distant hint of spring is in the air! At least I want to think so! Yes, I did enjoy the snow fall we had just last week, but this sunshine and warm temps are making me want to spring forward to the warm weather!

20150308_155127

Today was a gorgeous day! Lots of sunshine flooding the house and it is almost too warm to have the pellet stove running! At times like this, my mind wanders aimlessly about the multitude of possibilities to create something wonderful and delicious. I had totally delicious, caramely baked sweet potato, two pounds of gorgeous, juicy, vibrant red strawberries, especially with tons of actual ripe fruit flavor, lots of flour and yeast and other basic baking must haves.

20150308_160052  20150308_160554

So, I decided to whip up two totally different recipes….Strawberry Cheesecake Muffins (yes, had to use up some leftover cream cheese too) and sweet potato yeast bread! Yum! First up…..THE muffins!

20150308_170957

There are three parts to this recipe from Patty’s Food. I made couple of modifications by replacing half the all-purpose flour with whole wheat, reducing the amount of sugar to less than 1/2 cup and replacing half the flour in the streusel topping with old-fashioned oats.

20150308_170832

These muffins are super delicious. Because of the whole wheat in them, they are not as airy as regular muffins, but the flavor of the berries and the subtle citrus flavor from the cheesecake filling are more than enough to want to indulge in another one! And maybe you should!

strawberry muffin

  • Servings: ”12
  • Print

Ingredients:

For the muffin batter
1 cup whole wheat flour
1 cup all-purpose flour
2 teaspoon baking powder
1/4 teaspoon salt
1/2 cup (or less granulated sugar)
1/4 cup oil
1 extra large egg, lightly beaten
1 cup 1% or 2 % milk
2 cups diced sweet strawberries
1 teaspoon vanilla

For the cheesecake filling
4 oz reduced fat cream cheese, softened
grated rind of 1/2 lime or lemon
1/2 teaspoon vanilla
2 tablespoons beaten egg (from above)
3 tablespoons granulated sugar

For the streusel topping
2 tablespoons cold butter
3 tablespoons rolled oats
3 tablespoons all-purpose flour
2 tablespoons granulated sugar

Preparation:
1. Preheat oven to 350F. Line a muffin tray with paper liners and set aside.
2. Prepare streusel topping by combining all the ingredients till they are crumbly. Set aside.
3. Prepare the cheesecake filling by thoroughly combining all the ingredients. Set aside.
4. Begin the preparation of the muffin batter by sifting all the dry ingredients into a bowl.
5. Combine egg, oil, milk and vanilla.
6. Add the dry ingredients to wet mix and gently fold to combine. Do not over mix.
7. Scoop a tablespoon of batter into each of the muffin wells. Drop a dollop of the cheesecake mixture on top of the batter.
8. Divide the chopped strawberries in half. Evenly distribute one half of the strawberries over the cheesecake mix. Divide the rest of the muffin batter evenly among all the muffin cups.
9. Sprinkle rest of the strawberries over the batter, followed by the streusel topping.
10. Bake for 25-27 minutes. Remove from oven and let cool completely.

Super Crown Muffins


20150213_083008

Baking is one of my favorite ways to start my day! It doesn’t matter what day of the week it is – if I get the desire, I jump to action, pulling out the staples while thinking about the flavors or the mix-ins.

20150209_071820Even though they mostly turned out deliciously moist and flavorful, I was never fully impressed with how they looked. For every batch I pulled out of the oven, my hankering for perfecting the beautiful super crowns you see in coffeehouse muffins kept getting stronger! No matter how much I researched on tips and techniques, my heart would sink every time I pulled out a delicious yet flat muffin batch – well, until this week!

20150209_072107

So, you see, I didn’t give up! I kept whipping up batch after batch nearly every week! After all, they do make great after school snack or mid morning pick me upper even if they are flat topped! I tried tweaking an ingredient here and ingredient there, while still trying to keep the end product relatively healthy! Yes, “healthy” is a loosely used term, so let me explain what I mean. These muffins don’t use much added fat (1/4 cup oil for a dozen), use a blend of whole wheat, all purpose and wheat germ, touch of honey and a bit of boost from 1% milk and fat free yogurt! In my opinion, this probably qualifies as relatively healthy compared to what you will pick up at the grocery store or your favorite coffeehouse. And the best part….this recipe is awesome for those of you who want to use few different mix-ins – like the blueberries and chocolate chip versions I made here. Read on to find out more!

20150213_072139

So, unlike what you might read on the internet about having to overfill the muffin pans to achieve the sky-high crown effect, these muffins do just great with about 3/4 fill. They puff up so beautifully that I sometimes catch myself taking a few peeks before they are done! 🙂 And the golden color….You have to try this to experience the joy yourself! So, I hope you will grab couple of mixing bowls and go to task! Enjoy!

20150209_080446  20150209_082600

Super Crown Muffins

  • Servings: 12 muffins
  • Print

Ingredients
1 1/4 cup whole wheat flour
1 cup all purpose flour
1/4 cup toasted wheat germ
1 1/2 teaspoon baking powder
1/2 teaspoon baking soda
1/4 teaspoon salt
2 eggs, lightly beaten
1/4 cup fat free plain yogurt
1/4 cup canola oil
1/4 cup honey
1 cup 1% milk
Add-ins: Chocolate chips, nuts, berries…
Optional: Streusel topping: Combine 2 tablespoons all purpose flour, 1 teaspoon brown sugar, 1/4 cup rolled oats, 1 tablespoon butter, 1/4 teaspoon ground cinnamon

Preparation:
1. Preheat oven to 400F. Grease a 12-well muffin pan and set aside (or alternatively use paper liners)
2. In a large mixing bowl, combine all dry ingredients
3. In a small mixing bowl, combine all the wet ingredients
4. Add the wet ingredients to the dry and gently fold in just until the flour mixture gets moistened. DO NOT OVERMIX!
5. Scoop about a tablespoon of batter into each greased well. Add a few chocolate chips or berries or whatever you choose. Divide rest of the batter evenly among all the wells and top with few more chocolate chips or other add-in of your choice.
6. If using streusel topping, divide it evenly among all the muffins.
7. Bake for about 20 minutes till the crowns are puffed up and beautifully golden!
8. At the end of baking, remove the pan and let the muffins cool for a few minutes before moving them to a cooling rack to cool completely.

You can refrigerate these muffins for 3-5 days. Because of the low fat content, the muffins taste better when you microwave for just a few seconds!

Braided Chicken and Spinach Bread

20150110_204825

For all the sighs and groans I hear about working with yeast, I must say, they are not that difficult to work with – that is, provided you have unexpired yeast that you know to keep alive!

20150110_192606  20150110_184812

You think that sounds a bit gory – like some man eating zombie or something! May be I feel that way because I forced myself to watch the much anticipated (not by me by any means) return of The Walking Dead last night! Eeewww…to stupid and….stupid if you ask me! After enjoying Will Smith’s “I am a Legend”, I am content with not watching any more zombie nonsense!

20150110_192830

Anyway, back to yeast! Yes, so if you have braved to make a simple pizza dough, you have passed the threshold into the vast untapped potential of bread making! If you are still contemplating your first encounter with these little eukaryotes, then, fear not…just grab yourself a refrigerated pizza or bread dough from the store! Yes, yes, there is always a place for Pillsbury’s in everyone’s kitchen!

20150110_201147

This recipe is pretty simple and straightforward. Make a savory filling of your choice (let your imagination run wild), roll out the dough, place the filling, score opposite ends of the dough (they will look like a millipede or something similar with a gazillion legs), braid, brush with egg wash and bake! Trust me…it’s a fun art project like endeavor. Once you bake these, you will want to make more! They keep well in the refrigerator for a few days and make a great lunch (make them into single-serving sizes) to pack – for kids, for your spouse, for YOU! If you make them small enough, they also make a great snack for a road trip – depending on your filling and your own taste buds, they taste fine at room temperature as well.

20150110_202511  20150110_204806

So, I hope you won’t skim this recipe and take a pass! Give it a try and I am pretty sure this will become a keeper!

20150110_204835

Braided Chicken and Spinach Bread

  • Servings: 4
  • Print

Ingredients
1 container refrigerated pizza or bread dough (like Pillsbury’s)
OR
1 recipe (equivalent of 1 loaf of bread or 1 12-16″ pizza) of your choice
3/4 lb boneless, skinless chicken* (thighs or breast), seasoned with salt and pepper
1 8oz package frozen, chopped spinach, thawed and excess liquid squeezed out
2 tablespoons olive oil
2 cloves of garlic, finely minced
1/4 cup finely chopped onion
1/2 teaspoon ground cumin
1/2 teaspoon paprika
salt and pepper to taste
1/2 cup grated mozzarella or cheddar, optional

Preparation:
1. Preheat oven to 400F.
2. Heat 1 tablespoon of olive oil in a non-stick skillet over medium high heat. Cook the chicken breast or thighs on each side till golden brown, lower heat to medium and continue cooking for another 5-7 minutes on each side till the chicken is cooked through and all juices run clear. You may need to adjust the cooking time depending on the thickness of the meat.
3. Remove cooked chicken to a platter and let rest. Once the chicken is cool, shred the meat or dice into tiny cubes.
4. Return the pan to heat and add the remaining tablespoon of oil. Saute onion and garlic till fragrant (about 2-3 minutes). Add the ground cumin and paprika, stir to mix. Now, stir in the spinach.
5. Cook the spinach mixture till any remaining liquid evaporates. Add in the shredded chicken and heat through to blend in all the flavors.
6. Let the chicken-spinach mixture cool down to room temperature.
7. Divide the dough into 4 equal portions and roll out into a 1/4 inch thick rectangle.
8. Place 1/4th of the filling along the center of the dough, lengthwise, leaving about 2-3 inches on each long side.
9. Using a sharp knife, cut 1/2 inch strips along each side of the filling like shown in the picture. Criss-cross the strips like braiding and tuck in the ends. Brush with the egg wash.
10. Place all the braids on a parchment lined sheet pan and bake for 18-20 minutes till the tops are golden brown and the dough is cooked through.

You can serve this immediately with a dipping sauce of your choice or refrigerate for later enjoyment!

* Instead of cooking the chicken, you can certainly substitute leftover grilled or poached chicken. Just skip steps 2 and 3!

Comfort Pasta with Kale and Ground Beef

20150126_114856

What is it with pasta and the gazillion ways in which you can prepare them! They truly are a star pantry item!

I know I said I am going to try to get back on my healthy wagon, so I think you will appreciate this recipe. Yes, yes, it’s almost the end of January when most of the resolutions fall to the wayside. But, after trying this recipe, eating healthy may not be that difficult after all.

20150126_122005

This recipe is pretty simple, something I concocted while recovering from a mini version of the flu (thankfully short-lived due to Tamiflu). I didn’t quite have the energy to spend an hour in the kitchen, but at the same time didn’t want to be bed sofa-ridden for another meal. So, there I lay making a mental rundown on the items I had on hand, especially the pound of extra lean beef I was going to make chili with before I fell sick.

20150126_122422

So, now that the chili making was off the table till next weekend, I figured I should use up the beef in some form rather than freezing it. Pasta dish it will be! Kale, carrots, mushrooms, beef and a touch of cream and garlic! Simple, yet comforting enough!

20150126_130434

What are you waiting for? Grab the handful of ingredients this recipe calls for and whip up this dish while the pasta cooks! Yes, it is that simple! Go ahead and try it, you might actually end up planning to make it again soon!

20150126_130444

  • Servings: ”4″
  • Print

Ingredients
1/2 package pasta of your choice (I used penne)
1 tablespoon olive oil
2 large cloves of garlic, minced
1/4 cup finely chopped onion
1/2 pound lean (or extra-lean) ground beef
1 small bunch kale, rinsed and broken into small pieces
1 large carrot, peeled and cut into small cubes
2 cups of slices mushrooms
1 teaspoon Italian seasoning
dash of ground black pepper
Salt to taste
1/4 teaspoon freshly grated nutmeg
2 tablespoons of cream
1/4 cup grated parmesan
crushed red pepper, optional

Preparation
1. Bring a large pot of water to boil. Season with salt and cook pasta per directions.
2. In a large pot, heat a tablespoon of olive oil. Saute garlic and onion till translucent.
3. Add ground beef and brown the meat, breaking up any large clumps.
4. Add the carrots and continue cooking for another 5 minutes.
5. Now, add the kale and mushrooms and saute for another 3-5 minutes.
6. Season with Italian seasoning, black pepper and salt per your taste.
7. Add the cream and grate the nutmeg.
8. Toss with pasta and serve with a sprinkling of parmesan and crushed red pepper, if desired.